Reverse Engineering with Kaitai Struct

Reverse engineering the easy way

Imagine you have some kind of 3rd party data storage that you need to understand how to work with and the only thing you have is a detailed description of the protocol using the device. The only problem is that there is no source code available that can make this process easy to accomplish. And what is left is to implement manually this protocol while having lots of trial and error iterations. Next time in similar occasion repeat this difficult process once again. But no worries, there is one tool that comes in handy in situations like this when there is a file or a stream that you want to parse and you want to be able to do it fast.  

Meet Kaitai Struct

First, here comes an official description of Kaitai Struct

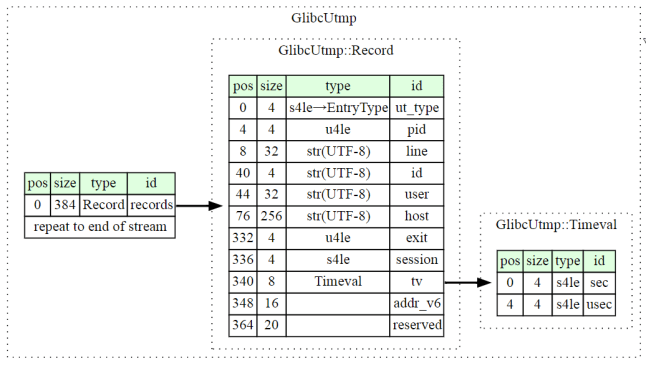
Kaitai Struct is a domain-specific language (DSL) that is designed with one particular task in mind: dealing with arbitrary binary formats.

Parsing binary formats is hard, and that’s a reason for that: such formats were designed to be machine-readable, not human-readable. Even when one’s working with a clean, well-documented format, there are multiple pitfalls that await the developer: endianness issues, in-memory structure alignment, variable size structures, conditional fields, repetitions, fields that depend on other fields previously read, etc, etc, to name a few.

Kaitai Struct tries to isolate the developer from all these details and allow to focus on the things that matter: the data structure itself, not particular ways to read or write it.

Features

  • Kaitai is supported on Linux and Windows (not sure about Mac).
  • So far, Kaitai supports generating parsers in following languages
    • C++/STL
    • C#
    • Java
    • JavaScript
    • Perl
    • PHP
    • Python
    • Ruby
  • If you want you are welcome to add one more language to the list

How to use this Kaitai?

In short, to use Katai 

  • You use declarative syntax to describe a data source you want to be able to parse, such as file system or image format or whatever you like, in ksy file. 
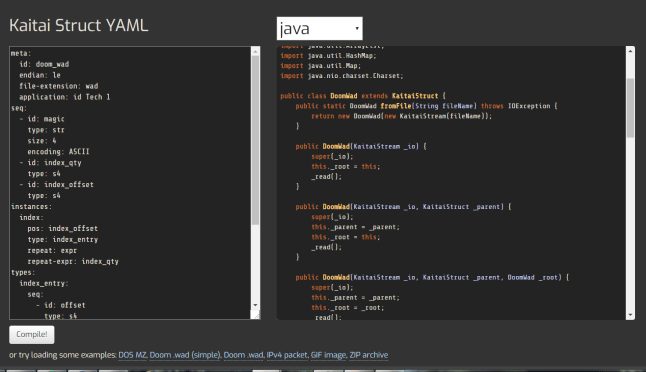
  • Then using Kaitai Web IDE or Katai Struct compiler you generate a code in one of the relevant supported languages, such as Java, C#, C++ etc.
  • That’s it. Now use the code to get full access to your data source.

Kaitai REPL (Read–Eval–Print Loop) 

repl.png

To get a feeling what Kaitai is capable of you can start from playing with Kaitai REPL which has a number of examples showcasing what can be achieved with it, such as parsing doom.wad package files format.

Katai Web IDE

2017_09_17_23_16_07_Kaitai_Web_IDE.jpg

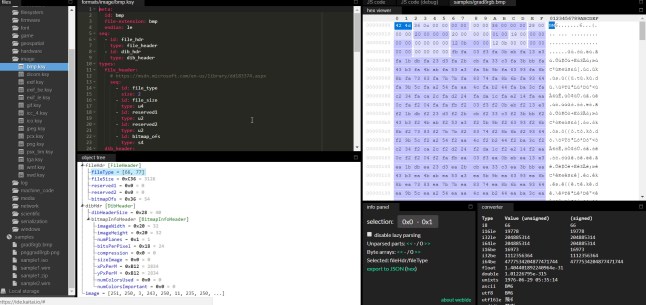
If you think you are ready to start applying Kaitai to real problems then jump into Katai Web IDE which is very nice and easy to use. You can upload there your data source and start writing a description of how the data source is organized. 

This official wiki page will show you the main features or Web IDE.

Kaitai Compiler stand alone 

It is possible to use Katai compiler in a stand alone mode via command line interface of your choice be it on Linux, Windows etc. How to do it is described here.

Resources

mikhail.png

 Java Code Geeks

A Digest of Deep Learning Pearls

All you need is time and GPU

Try to allocate time for these thought provoking Deep Learning papers. Part of them with try it yourself implementation at GitHub.

1. Try it yourself at home or anywhere at all (with GPU)

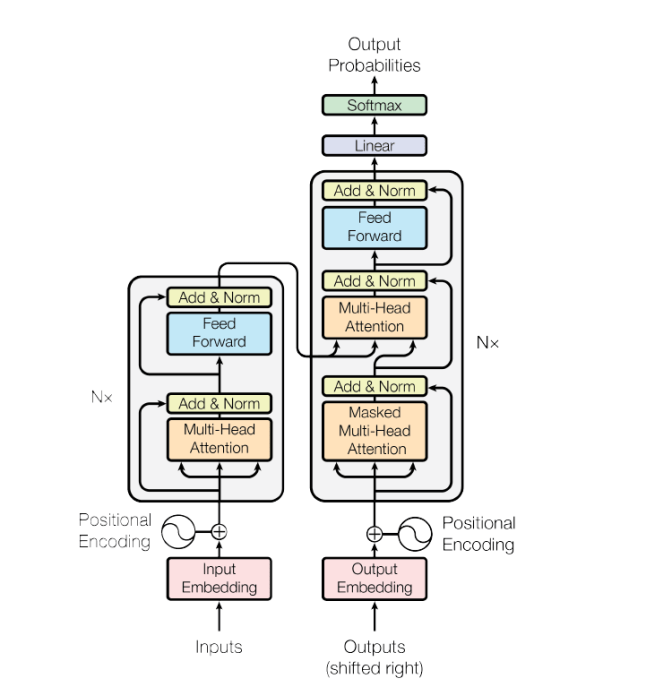
Transformer more than meet the eye!
– A novel approach to language understanding from Google Brain(via David Ha)
It is a very interesting solution for an old linguistic/ syntactic challenge (anaphora) with Deep Learning. More detailed explanation of anaphora resolution.
– Based on “Attention is all you need” paper

2. Learning To Remember Rare Events

An interesting approach to introduce memory module into various types of Deep Learning architectures to provide them with life long learning.

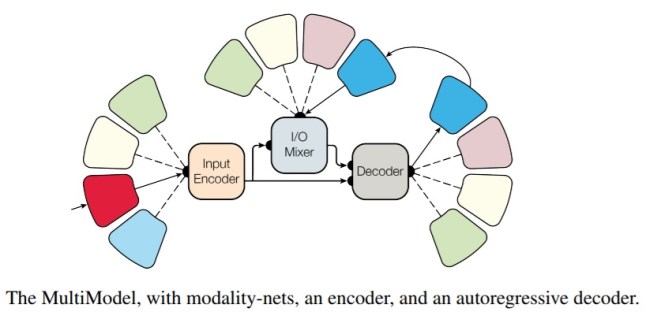
3. One Model To Learn Them All

A unified Deep Learning model that is capable of being applied to inputs from various modalities. It is a one step closer toward general DL architectures.

4. Meet Fashion-MNIST

Finally, it is time to ditch MNIST in favor of Fashion-MNIST

Which is better from a number of aspects. Which one? Find yourself.

**Note:

If you haven’t noticed the one thing in common to all of these items except for one is
Łukasz Kaiser researcher from Google Brain.

 Java Code Geeks

NLP is Natural Language Processing

Get ready for a real NLP

I am back to blogging and have a motivation to post a number of posts (or at least one) on the subject of Natural Language Processing. Upcoming posts also will contain information on recurrent neural networks such as LSTM. So stay tuned.

For now, check this out

If you are into Natural Language Processing (NLP) then you may find links below useful.

Papers

1. Attention Is All You Need paper in arxiv.


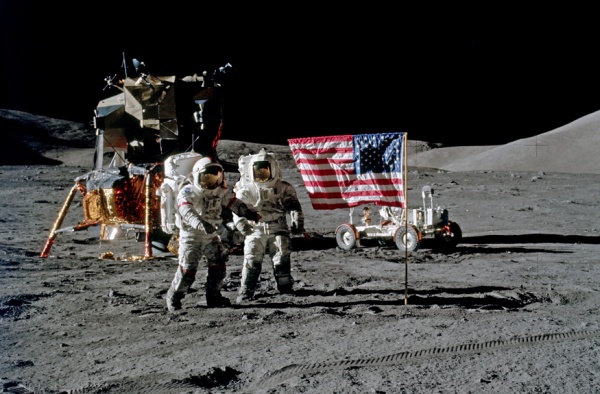
Deep Space, Do You Copy?

600px-AS17-Flag_shots

There are other things too

In the middle of Deep Learning rush we forget that there are other things on this planet and off it that are fascinating. That’s right, I want to share with you the best materials I saw so far on Moon exploration that are highly recommended.

Books From Apollo Participants 

There are quite a few books written about US space program. But there are few that are really good. I’ve chanced to read some of them and below follow the best ones in my opinion.

The Last Man On The Moon Book

last1

The Last Man on the Moon: Astronaut Eugene Cernan and America’s Race in Space

This book is very special and it is a memoir by Gene Cernan the commander of Apollo 17. He was literally the last person to walk on the moon.

Pros. There is a special atmosphere in this book. The descriptions are so vivid and colorful. Gene Cernan was deeply touched by lunar visits since he was there twice on Apollo 10 and then Apollo 17. It is available on Kindle.

                                               Cons. It finished so fast. (No photos in the book)

The Last Man On The Moon Movie

lastmanmoon.jpg

There is also a movie named the same which may be found for free on the internet or bought here. Here is the trailer.

Two Sides of the Moon: Our Story of the Cold War Space Race

2side

Two Sides of the Moon: Our Story of the Cold War Space Race

This book combines recollections by Apollo 15 commander David Scott and his contemporary Alexi Leonov who was the first man to walk in space.

Pros. Very interesting book because of complementing accounts provided by both distinguished persons. Available in Kindle format.

Cons. Not a single photo.

From The Other Side

failureFailure Is Not an Option: Mission Control From Mercury to Apollo 13 and Beyond

The book below provides very different account of the matters described in the books above. It is written by Gene Kranz the Flight throughout entire US space program starting from Mercury and ending in Shuttle era.

Pros. The more technical book than astronauts accounts. Available on Kindle.

Cons. No photos again.

Documentaries that cannot be missed

  1. EARTHRISE: The First Lunar Voyage – documentary about Apollo 10.
  2. Apollo 13 Documentary 1958 – as it was portrayed by NASA.
  3. Apollo 15 Remembered 40 Years Later – documentary for Apollo 15 featuring Neil Armstrong and others.
  4. In The Shadow of The Moon – british documentary with interesting stuff.
  5. The Last Man On The Moon – documentary featuring Gene Cernan.
  6. Failure Is Not An Option A Flight Control History of NASA – documentary featuring flight controllers and Gene Kranz.
  7. Moon Machines – tools that made lunar program possible and people behind them.
  8. From The Earth To The Moon – a series produced by Tom Hanks. 

Not because they are easy, but because they are hard!

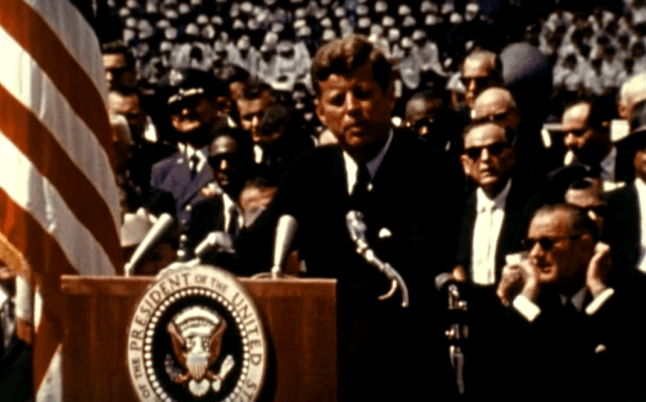
This post can’t be finished without the full inspirational to say the least speech by John F. Kennedy. It is incomparable to the current president of the US. It is a giant  speech for a president and a giant gap between then and now. 

potus.png

President Kennedy’s Speech at Rice University

No winter but AI global warming

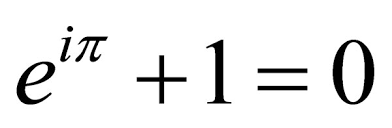
formula

Name things for what they are

Is Deep Learning rage simply a bubble or is this time it here for a long time to stay. As researchers proposed first let’s change the Deep Learning title into the more humble and exact Multilayered Network for Functions Approximation. Now it sounds more practical and there is no sign of hype. Then check to what fields those networks were applied and see if it is diverse and if the algorithms used are universally applicable. Check the number of articles published that have a real essence within them. If you’ve got ‘yes’ as an answer to those questions then it feels like finally those approaches are really usefull.

What’s next?

This post will be updated in a near future. Meanwhile check the posts by Carlos E. Perez from IntuitionMachine.com that writes extensively on the subject and do not forget to check his ‘The Deep Learning Playbook‘

Wind of Deep Change

Welcome to the world of Machine and Deep Learning

Following my transition to another continent in near future I’ll be able to focus more on Machine and Deep Learning being a technical editor at renowned Machine Learning Mastery site authored by Dr. Jason Brownlee. It means you can expect more posts on machine learning to come especially on LSTM and recurrent neural networks.

What is it like to be a technical editor?

Throughout my career I’ve been a SW test engineer and SW developer but in parallel I’ve been busy helping to edit books as Jumping Into C++ by Alex Allain and other projects, such as Kindle Optimizer Chrome extension. So becoming a technical editor in machine learning field is just a logical step to make. Actually technical editor is a bit like a QA engineer and a developer at once since you have to understand how Python code is working to make that LSTM to be able to predict time series values and to be a test engineer to make the content and the code to be as good as it can be. In addition, there is a kind of freedom that regular tester or developer do not possess which is to suggest changes to the author which may be meaningful and influential. Most importantly, technical editor deals with the raw content of a future article, a blog post or a chapter from the book that millions of people may read and it provides you with the understanding of the responsibility that you bear on your shoulders. The corrections that you make may influence readers and make their experience pleasant or not.

Why machine or deep learning after all?

Technical editing as testing or programming is a universal position since it can be successfully applied to various topics in those fields, but machine learning has the proper ingredients of math, programming and future potential that makes it very attractive.

Stay tuned as John Sonmez says

So if you follow this blog stay around the corner to be up to date with the current progress in Deep Learning field and if you care check this public Deep Learning for All group at Facebook where I share latest and in my view greatest news coming from Deep Learning fruitful field.


How to achieve a goal?

Set a goal

Set any  goal that does not contradict known laws of physics, though remember that not all laws are known to us. 

Create a plan

Write a quick plan for a goal. Detailed or not it doesn’t matter since it will be refined in time.

Remember this while acting on a plan

A goal will be achieved by a plan while moving towards it

  • Gradually
  • Consistently
  • Constantly

It is a great force

Acting in this way is like being a force of nature.


OpenCV installation on Linux and Windows

ubuntu_opencv-1

How hard is to install OpenCV?

This was the question that I asked myself lately when I needed to use OpenCV for a project. I thought it must be simpler on Ubuntu than on Windows. But I was wrong. The goal of this tutorial is to provide working guidelines for OpenCV installation. I’ll cover installation instructions for OpenCV with following configurations:

Windows 7/ 10 

  • OpenCV 3.x.x with Python 2.7
  • OpenCV 3.x.x with Python 3.5

Ubuntu 16.04 

  • OpenCV 3.x.x with Python 3.5

Installation on Windows 7/ 10

OpenCV 3.x.x with Python 2.7 on Windows 32 bit

To have all the dependencies that are related to Python it is useful to install Anaconda.

  • Install Anaconda 2 for Python 2.7 (32 or 64 bit)
  • Install Anaconda 3 for Python 3.5 (32 or 64 bit)
  • Now we can install OpenCV by using pre-built libraries by downloading them from here.
  • For the sake of this tutorial I used OpenCV version 3.2.0
    • opencv-3.2.0-vc14.exe
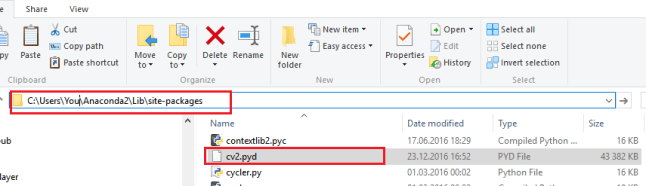
  • After you’ve installed downloaded OpenCV version there is a need to move cv2.pyd file to a Python installation library.

Look for the cv2.pyd at the opencv installation folder

C:\Users\You\Downloads\opencv\build\python\2.7\x64\cv2.pyd

And move the cv2.pyd file to Python 2.7 installation folder

C:\Users\You\Anaconda2\Lib\site-packages\cv2.pyd

python_2.7.png

Example application

  • To test that opencv installed correctly
  • Open command line and run python. Then type the commands below to figure out what is the current opencv version.
C:\Users\You>python
Python 2.7.13 |Anaconda 4.3.0 (32-bit)| (default, Dec 19 2016, 13:36:02) [MSC v.1500 32 bit (Intel)] on win32
Type "help", "copyright", "credits" or "license" for more information.
Anaconda is brought to you by Continuum Analytics.
Please check out: http://continuum.io/thanks and https://anaconda.org
>>> import cv2
>>> print(cv2.__version__)
3.2.0
>>>

OpenCV 3.x.x with Python 3.5 using Wheel on Windows 7 64 bit

  • There is no library for Python 3.5 support in OpenCV out of the box that is why we can use  unofficial Windows binaries for Python extension packages from here to be able to use it.

Note: I downloaded this one because I have Windows 7 64 bit

  • opencv_python-3.2.0-cp35-cp35m-win_amd64.whl

Pay attention that 3.2.0 means opencv version i.e. opencv-3.2.0

cp35 means Python version i.e. Python 3.5

  • After you downloaded this file open the command line and open the directory this file located in. For example, let’s say it was downloaded to Downloads folder.
  • Change current folder to Downloads 
C:\>cd C:\Users\You\Downloads
  • Install wheel with pip install command
C:\Users\You\Downloads>pip install opencv_python-3.2.0-cp35-cp35m-win_amd64.whl
Processing c:\users\andrei\downloads\opencv_python-3.2.0-cp35-cp35m-win_amd64.whl
Installing collected packages: opencv-python
Successfully installed opencv-python-3.2.0
You are using pip version 8.1.2, however version 9.0.1 is available.
You should consider upgrading via the 'python -m pip install --upgrade pip' command.

C:\Users\You\Downloads>
  • Pay attention that you saw this line ‘Successfully installed opencv-python-3.2.0’

Example application

  • To test that opencv installed correctly
  • Open command line and run python. Then type the commands below to figure out what is the current opencv version.
C:\Users\You\Downloads>python
Python 3.5.2 |Anaconda 4.2.0 (64-bit)| (default, Jul 5 2016, 11:41:13) [MSC v.1900 64 bit (AMD64)] on win32
Type "help", "copyright", "credits" or "license" for more information.
>>> import cv2
>>> print(cv2.__version__)
3.2.0
>>>

Additional resources

Installation on Ubuntu 16.04

To install OpenCV on Ubuntu follow the steps in the guides below. The first one is the best and it worked for me.

  • Simply run this command for basic opencv3 installation.
conda install -c menpo opencv3
  • If Anaconda is not installed then run this one to install it.
sudo apt-get install python-opencv

Additional resources

What’s next?

Now that you have a working OpenCV you may watch this nice tutorial by Siraj Raval that is funny and hands on with OpenCV. It will teach you How to do Object Detection with OpenCV. It will also teach you that there is a need to run a code at least once before filming a YouTube video.

In addition if you are interested in object detection with OpenCV then definitely look at Satya Mallick tutorial on the subject.

 Java Code Geeks

Kids gonna love LSTM deep learning network

Teaser

Prepare for an upcoming Android game from neaapps applications development. This game will be based on a LSTM deep learning network for prediction of a next character from various length characters string.

For now you can check out the already existing apps brought to you by neaapps.

Why Long Short Term Memory deep learning network?

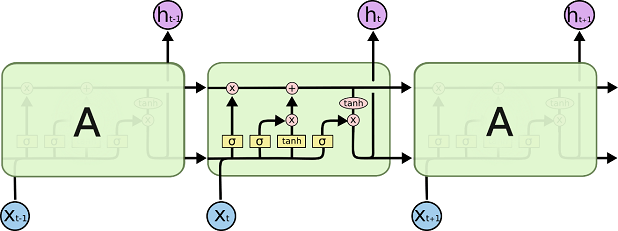
It turns out that LSTM is very good at learning and predicting sequences of patterns. That is why it is natural to use it for creating engaging games for little and not so kids. For more information what is LSTM and how to use it read Chris Olah’s post.

Stay tuned

It will be available soon in the nearest  Google Play Store.

Resources

The inspiration for this application came from a chapter on LSTM from Jason Brownlee’s Deep Learning With Python book.

Multilayer Perceptron Predictions Exposed

start_mlp_image.pngLearning Deep Learning

Currently, I learn Deep Learning fundamentals with the help of Jason Brownlee’s Deep Learning with Python book. It provides good practical coverage of building various types of deep learning networks such CNN, RNN etc. Running each model in the book is accompanied with providing various metrics, for instance, accuracy of the model. But accuracy does not provide a real feeling of the image recognition. To improve upon this I updated one of the code samples that came with the book with my own implementation that ran the model with an image file to perform a classification on it. The detailed steps explaining this follows.

What Will We Do?

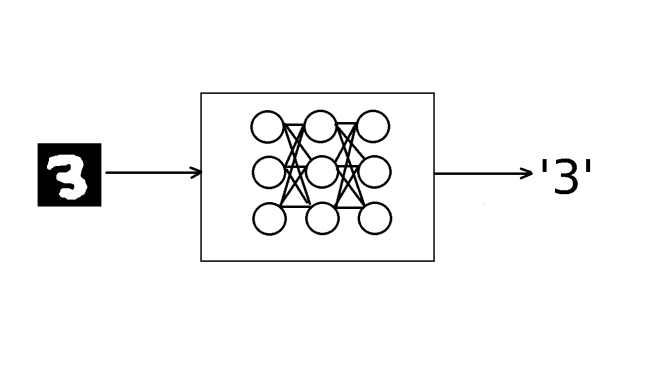
This tutorial explains how to build a working simple multilayer perceptron network consisting of one hidden layer. In addition to working model that is trained on handwritten digits of MNIST data-set we’ll see how can an image of a digit taken from this data-set can be classified using this network.

  • Multilayer perceptron network is composed of a network of layers of fully connected artificial neurons. In our case it is built of three layers: input layer, hidden layer and output layer.
  • MNIST database is an abbreviation of the Mixed National Institute of Standards and Technology database for handwritten digits. It has a training set of 60,000 examples, and a test set of 10,000 examples. It is used for supervised learning of artificial neural networks to classify handwritten digits.

How Do We Do It?

To accomplish this task there is a need to fulfill certain prerequisites. A number of steps below were explained in a post on Keras, Theano and TensorFlow (KTT).

Prerequisites

  1. Supported operating systems are 
    1. Ubuntu 16.04 64 bit
    2. Windows 10 or 7 64 bit
  2. Python 2 or Python 3 installed with Anaconda 2 or 3 respectively. See KTT for more details.
  3. Works with following deep learning libraries. See KTT for more details.
    1. TensorFlow and Theano
    2. Keras
  4. May be run within Jupyter Notebook. See installation steps here.

Building a Network

The multilayer perceptron in this particular case is built of three layers.

  • Input layer with 784 inputs that are calculated from 28 x 28 pixel image that is 784 pixels.
  • Hidden middle layer with 784 neurons and rectifier activation function
  • Output layer with 10 outputs that give a probability of prediction by softmax activation function for each digit from ‘0’ to ‘9’.

The overall structure of the network

mlp

The Code Overview

The code structured as  follows.

  1. Import proper Python libraries for working with Deep Learning networks.
  2. Fetch image file from a disk in accordance with host Operating System
  3. Load an image to be classified 
  4. Load MNIST dataset and preprocess images pixels into arrays
  5. Define helper functions 
  6. Prepare multilayer perceptron model and compile it
  7. Check if trained model exists
  8. If not train new model, save it and predict image 
  9. Else load current model and predict image 

The code

The code below is brought to you in full and can be found in GitHub repository in addition to saved model and Jupyter Notebook that makes it possible to run this code module after module in a really interactive way.

  • Import proper Python libraries for working with Deep Learning networks
# Baseline MLP for MNIST dataset
import numpy
import skimage.io as io 
import os 
import platform
import getpass
from keras.datasets import mnist
from keras.models import Sequential
from keras.layers import Dense
from keras.layers import Dropout
from keras.utils import np_utils
from keras.models import model_from_json
from os.path import isfile, join

# fix random seed for reproducibility
seed = 7
numpy.random.seed(seed)
  • Fetch image file from a disk in accordance with host Operating System. In our case it is a 28 x 28 pixel image of ‘3’ digit form MNIST dataset
  • Load an image to be classified 
# load data
platform = platform.system()
currentUser = getpass.getuser()
currentDirectory = os.getcwd()

if platform is 'Windows':
 #path_image = 'C:\\Users\\' + currentUser
 path_image = currentDirectory 
else: 
 #path_image = '/user/' + currentUser
 path_image = currentDirectory 
fn = 'image.png'
img = io.imread(os.path.join(path_image, fn))
  • Load MNIST dataset and preprocess images pixels into arrays
# prepare arrays
X_t = []
y_t = []
X_t.append(img)
y_t.append(3)

X_t = numpy.asarray(X_t)
y_t = numpy.asarray(y_t)
y_t = np_utils.to_categorical(y_t, 10)

(X_train, y_train), (X_test, y_test) = mnist.load_data()

# flatten 28*28 images to a 784 vector for each image
num_pixels = X_train.shape[1] * X_train.shape[2]
X_train = X_train.reshape(X_train.shape[0], num_pixels).astype('float32')
X_test = X_test.reshape(X_test.shape[0], num_pixels).astype('float32')
X_t = X_t.reshape(X_t.shape[0], num_pixels).astype('float32')

# normalize inputs from 0-255 to 0-1
X_train = X_train / 255
X_test = X_test / 255
X_t /= 255

print('X_train shape:', X_train.shape)
print ('X_t shape:', X_t.shape)
print(X_train.shape[0], 'train samples')
print(X_test.shape[0], 'test samples')
print(X_t.shape[0], 'test images')

# one hot encode outputs
y_train = np_utils.to_categorical(y_train)
y_test = np_utils.to_categorical(y_test)

num_classes = y_test.shape[1]
print(y_test.shape[1], 'number of classes')
  • Define helper functions 
# define baseline model
def baseline_model():
 # create model
 model = Sequential()
 model.add(Dense(num_pixels, input_dim=num_pixels, init='normal',activation='relu'))
 model.add(Dense(num_classes, init='normal', activation='softmax'))
 # Compile model
 model.compile(loss='categorical_crossentropy', optimizer='adam',metrics=['accuracy'])
 return model
 
def build_model(model):
 # build the model
 model = baseline_model()
 # Fit the model
 model.fit(X_train, y_train, validation_data=(X_test, y_test),nb_epoch=10, batch_size=200, verbose=2)
 return model

def save_model(model):
 # serialize model to JSON
 model_json = model.to_json()
 with open("model.json", "w") as json_file:
 json_file.write(model_json)
 # serialize weights to HDF5
 model.save_weights("model.h5")
 print("Saved model to disk")
 
def load_model():
 # load json and create model
 json_file = open('model.json', 'r')
 loaded_model_json = json_file.read()
 json_file.close()
 loaded_model = model_from_json(loaded_model_json)
 # load weights into new model
 loaded_model.load_weights("model.h5")
 if loaded_model:
 print("Loaded model")
 else:
 print("Model is not loaded correctly")
 return loaded_model

def print_class(scores):
 for index, score in numpy.ndenumerate(scores):
 number = index[1]
 print (number, "-", score)
 for index, score in numpy.ndenumerate(scores):
 if(score > 0.5):
 number = index[1]
 print ("\nNumber is: %d, probability is: %f" % (number, score))
  • Prepare multilayer perceptron model and compile it
model = baseline_model()
path = os.path.exists("model.json")
  • Check if trained model exists
  • If not train new model, save it and predict image 
if not path:
 model = build_model(model)
 save_model(model)
 # Final evaluation of the model
 scores = model.predict(X_t)
 print("Probabilities for each class\n")
 print_class(scores)
  • Else load current model and predict image 
else:
 # Final evaluation of the model
 loaded_model = load_model()
 if loaded_model is not None:
 loaded_model.compile(loss='categorical_crossentropy', optimizer='adam',metrics=['accuracy'])
 scores = loaded_model.predict(X_t)
 print("Probabilities for each class\n")
 print_class(scores)

How to Run 

If you downloaded/ cloned the project and you have all prerequisites set up then to run it simply type this command in terminal.

python mnist_mlp_baseline.py

The Prediction Exposed

The predicted output for the image of digit ‘3’ looks like this.

Probabilities for each class

(0, '-', 3.4988901e-07)
(1, '-', 3.7538914e-08)
(2, '-', 0.00072528532)
(3, '-', 0.99788445)
(4, '-', 1.7879113e-08)
(5, '-', 1.3890726e-06)
(6, '-', 2.5650074e-10)
(7, '-', 2.233218e-05)
(8, '-', 0.0012537371)
(9, '-', 0.00011237688)

Number is: 3, probability is: 0.997884

Resources

  • If you want to see a 3-D visualization of Multilayer Perceptron Network in action  built with two hidden layers then check this one
  • If you want to see a nice visualization of a shallow/ deep neural network and play with various parameters yourself in a real time then A Neural Network Playground is for you!

 Java Code Geeks