 Learning Deep Learning
Currently, I learn Deep Learning fundamentals with the help of Jason Brownlee’s Deep Learning with Python book. It provides good practical coverage of building various types of deep learning networks such CNN, RNN etc. Running each model in the book is accompanied with providing various metrics, for instance, accuracy of the model. But accuracy does not provide a real feeling of the image recognition. To improve upon this I updated one of the code samples that came with the book with my own implementation that ran the model with an image file to perform a classification on it. The detailed steps explaining this follows.
What Will We Do?
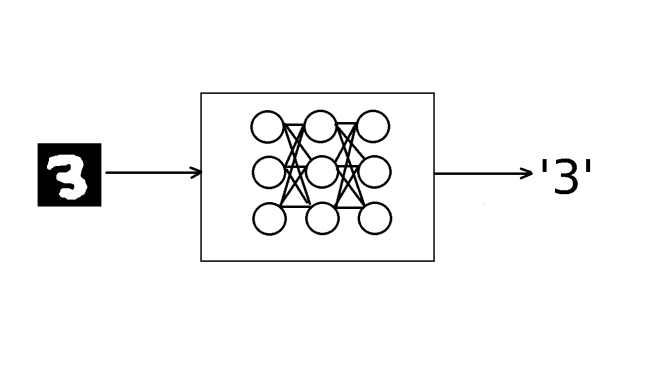
This tutorial explains how to build a working simple multilayer perceptron network consisting of one hidden layer. In addition to working model that is trained on handwritten digits of MNIST data-set we’ll see how can an image of a digit taken from this data-set can be classified using this network.
- Multilayer perceptron network is composed of a network of layers of fully connected artificial neurons. In our case it is built of three layers: input layer, hidden layer and output layer.
- MNIST database is an abbreviation of the Mixed National Institute of Standards and Technology database for handwritten digits. It has a training set of 60,000 examples, and a test set of 10,000 examples. It is used for supervised learning of artificial neural networks to classify handwritten digits.
How Do We Do It?
To accomplish this task there is a need to fulfill certain prerequisites. A number of steps below were explained in a post on Keras, Theano and TensorFlow (KTT).
Prerequisites
- Supported operating systems are
- Ubuntu 16.04 64 bit
- Windows 10 or 7 64 bit
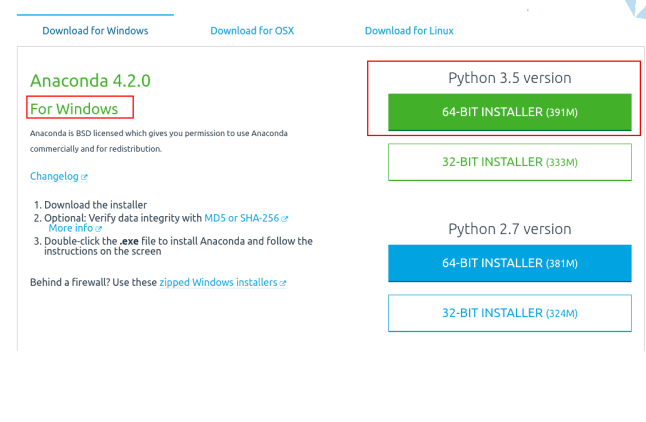
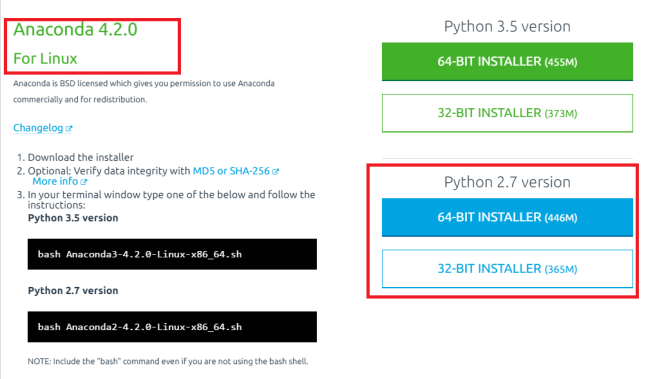
- Python 2 or Python 3 installed with Anaconda 2 or 3 respectively. See KTT for more details.
- Works with following deep learning libraries. See KTT for more details.
- TensorFlow and Theano
- Keras
- May be run within Jupyter Notebook. See installation steps here.
Building a Network
The multilayer perceptron in this particular case is built of three layers.
- Input layer with 784 inputs that are calculated from 28 x 28 pixel image that is 784 pixels.
- Hidden middle layer with 784 neurons and rectifier activation function
- Output layer with 10 outputs that give a probability of prediction by softmax activation function for each digit from ‘0’ to ‘9’.
The overall structure of the network

The Code Overview
The code structured as follows.
- Import proper Python libraries for working with Deep Learning networks.
- Fetch image file from a disk in accordance with host Operating System
- Load an image to be classified
- Load MNIST dataset and preprocess images pixels into arrays
- Define helper functions
- Prepare multilayer perceptron model and compile it
- Check if trained model exists
- If not train new model, save it and predict image
- Else load current model and predict image
The code
The code below is brought to you in full and can be found in GitHub repository in addition to saved model and Jupyter Notebook that makes it possible to run this code module after module in a really interactive way.
- Import proper Python libraries for working with Deep Learning networks
# Baseline MLP for MNIST dataset
import numpy
import skimage.io as io
import os
import platform
import getpass
from keras.datasets import mnist
from keras.models import Sequential
from keras.layers import Dense
from keras.layers import Dropout
from keras.utils import np_utils
from keras.models import model_from_json
from os.path import isfile, join

# fix random seed for reproducibility
seed = 7
numpy.random.seed(seed)
- Fetch image file from a disk in accordance with host Operating System. In our case it is a 28 x 28 pixel image of ‘3’ digit form MNIST dataset
- Load an image to be classified
# load data
platform = platform.system()
currentUser = getpass.getuser()
currentDirectory = os.getcwd()

if platform is 'Windows':
 #path_image = 'C:\\Users\\' + currentUser
 path_image = currentDirectory
else:
 #path_image = '/user/' + currentUser
 path_image = currentDirectory
fn = 'image.png'
img = io.imread(os.path.join(path_image, fn))
- Load MNIST dataset and preprocess images pixels into arrays
# prepare arrays
X_t = []
y_t = []
X_t.append(img)
y_t.append(3)

X_t = numpy.asarray(X_t)
y_t = numpy.asarray(y_t)
y_t = np_utils.to_categorical(y_t, 10)

(X_train, y_train), (X_test, y_test) = mnist.load_data()

# flatten 28*28 images to a 784 vector for each image
num_pixels = X_train.shape[1] * X_train.shape[2]
X_train = X_train.reshape(X_train.shape[0], num_pixels).astype('float32')
X_test = X_test.reshape(X_test.shape[0], num_pixels).astype('float32')
X_t = X_t.reshape(X_t.shape[0], num_pixels).astype('float32')

# normalize inputs from 0-255 to 0-1
X_train = X_train / 255
X_test = X_test / 255
X_t /= 255

print('X_train shape:', X_train.shape)
print ('X_t shape:', X_t.shape)
print(X_train.shape[0], 'train samples')
print(X_test.shape[0], 'test samples')
print(X_t.shape[0], 'test images')

# one hot encode outputs
y_train = np_utils.to_categorical(y_train)
y_test = np_utils.to_categorical(y_test)

num_classes = y_test.shape[1]
print(y_test.shape[1], 'number of classes')
- Define helper functions
# define baseline model
def baseline_model():
 # create model
 model = Sequential()
 model.add(Dense(num_pixels, input_dim=num_pixels, init='normal',activation='relu'))
 model.add(Dense(num_classes, init='normal', activation='softmax'))
 # Compile model
 model.compile(loss='categorical_crossentropy', optimizer='adam',metrics=['accuracy'])
 return model

def build_model(model):
 # build the model
 model = baseline_model()
 # Fit the model
 model.fit(X_train, y_train, validation_data=(X_test, y_test),nb_epoch=10, batch_size=200, verbose=2)
 return model

def save_model(model):
 # serialize model to JSON
 model_json = model.to_json()
 with open("model.json", "w") as json_file:
 json_file.write(model_json)
 # serialize weights to HDF5
 model.save_weights("model.h5")
 print("Saved model to disk")

def load_model():
 # load json and create model
 json_file = open('model.json', 'r')
 loaded_model_json = json_file.read()
 json_file.close()
 loaded_model = model_from_json(loaded_model_json)
 # load weights into new model
 loaded_model.load_weights("model.h5")
 if loaded_model:
 print("Loaded model")
 else:
 print("Model is not loaded correctly")
 return loaded_model

def print_class(scores):
 for index, score in numpy.ndenumerate(scores):
 number = index[1]
 print (number, "-", score)
 for index, score in numpy.ndenumerate(scores):
 if(score > 0.5):
 number = index[1]
 print ("\nNumber is: %d, probability is: %f" % (number, score))
- Prepare multilayer perceptron model and compile it
model = baseline_model()
path = os.path.exists("model.json")
- Check if trained model exists
- If not train new model, save it and predict image
if not path:
 model = build_model(model)
 save_model(model)
 # Final evaluation of the model
 scores = model.predict(X_t)
 print("Probabilities for each class\n")
 print_class(scores)
- Else load current model and predict image
else:
 # Final evaluation of the model
 loaded_model = load_model()
 if loaded_model is not None:
 loaded_model.compile(loss='categorical_crossentropy', optimizer='adam',metrics=['accuracy'])
 scores = loaded_model.predict(X_t)
 print("Probabilities for each class\n")
 print_class(scores)
How to Run
If you downloaded/ cloned the project and you have all prerequisites set up then to run it simply type this command in terminal.
python mnist_mlp_baseline.py
The Prediction Exposed
The predicted output for the image of digit ‘3’ looks like this.
Probabilities for each class

(0, '-', 3.4988901e-07)
(1, '-', 3.7538914e-08)
(2, '-', 0.00072528532)
(3, '-', 0.99788445)
(4, '-', 1.7879113e-08)
(5, '-', 1.3890726e-06)
(6, '-', 2.5650074e-10)
(7, '-', 2.233218e-05)
(8, '-', 0.0012537371)
(9, '-', 0.00011237688)

Number is: 3, probability is: 0.997884
Resources
- This project is based on code samples from Deep Learning with Python book by Jason Brownlee from Machine Learning Mastery site
- A few lines were taken from an Ahem Detector With Deep Learning blog post by Francesco Gadaleta from World of Piggy site.
- If you want to see a 3-D visualization of Multilayer Perceptron Network in action built with two hidden layers then check this one
- If you want to see a nice visualization of a shallow/ deep neural network and play with various parameters yourself in a real time then A Neural Network Playground is for you!
![]()