This post is written by my good friend Aviad Holy who’s a team leader at Checkmarx and an Android enthusiast.
Installation and linking
Prerequisites
- If you have no node.js installed then there is a need to install npm (node package manger which includes node.js)
- If you do not have yarn installed then
- If you have no React Native installed
To see React Native live without installing anything check out Snack.
With my current setup (Windows 10 64 bit and Android phone)
- I installed all prerequisites above
- Created AwesomeProject with expo-cli as explained in the React Native guide
- Started development server
C:\Users\xyz\AppData\Roaming>cd AwesomeProject

C:\Users\xyz\AppData\Roaming\AwesomeProject>yarn start
yarn run v1.22.10
- Installed Expo Go Android application
- Scanned QR Code shown in the development server

- And I saw app started on my Android phone

Now you’re ready to follow Aviad’s tutorial below
I was looking for a simple solution to generate a local push notification in one of my projects, when I came across this wonderful package that does exactly what is need and suitable for both iOS and Android, https://github.com/zo0r/react-native-push-notification.
The package has pretty good documentation, with only minor things missing to make it work straightforward. In the following guide I will present the configuration required and a suggested implementation to get you start pushing notifications locally.
This guide targets Android since I encounter a lot of questions around it.
- pending on your requests a dedicated guide for ios may be published as well.
Installation and linking, the short story.
- yarn add react-native-push-notification
- android/build.gradle
ext {
        buildToolsVersion = "29.0.3"
        minSdkVersion = 21
        compileSdkVersion = 29
        targetSdkVersion = 29
        ndkVersion = "20.1.5948944"
        googlePlayServicesVersion = "+" // default: "+"
        firebaseMessagingVersion = "+" // default: "+"
        supportLibVersion = "23.1.1" // default: 23.1.1
    }
- android/app/src/main/AndroidManifest.xml
<span class="has-inline-color has-black-color">...
<uses-permission android:name="android.permission.VIBRATE" />
<uses-permission android:name="android.permission.RECEIVE_BOOT_COMPLETED"/>
...
<application
...>
<meta-data  android:name="com.dieam.reactnativepushnotification.notification_foreground"
    android:value="false"/>
      <meta-data  android:name="com.dieam.reactnativepushnotification.notification_color"
          android:resource="@color/white"/>
      <receiver android:name="com.dieam.reactnativepushnotification.modules.RNPushNotificationActions" />
      <receiver android:name="com.dieam.reactnativepushnotification.modules.RNPushNotificationPublisher" />
      <receiver android:name="com.dieam.reactnativepushnotification.modules.RNPushNotificationBootEventReceiver">
        <intent-filter>
          <action android:name="android.intent.action.BOOT_COMPLETED" />
          <action android:name="android.intent.action.QUICKBOOT_POWERON" />
          <action android:name="com.htc.intent.action.QUICKBOOT_POWERON"/>
        </intent-filter>
      </receiver>
...
</application></span>
- create /app/src/main/res/values/colors.xml
<span class="has-inline-color has-black-color"><resources>
    <color name='white'>#FFF</color>
</resources></span>
- android/settings.gradle
include ':react-native-push-notification'
project(':react-native-push-notification').projectDir = file('../node_modules/react-native-push-notification/android')
- android/app/build.gradle
dependencies {
...
    implementation project(':react-native-push-notification')
...
}
Usage
- create a new file src/handlers/notificationsInit.js to initialize our push notification
Pay attention that for Android, creating a notification channel and setting the request permission as “iOS only” is a must, as presented in the following example.
<span class="has-inline-color has-black-color">import PushNotification from 'react-native-push-notification';
import { Platform } from 'react-native';

export const notificationsInit = () => {
    PushNotification.createChannel({
        channelId: 'channel-id-1',
        channelName: 'channel-name-1',
        playSound: true,
        soundName: 'default',
        importance: 4,
        vibrate: true,
    }, (created) => colnsloe.log(`createChannel returned '${created}'`)
    );
    PushNotification.configure({
        onRegister: function (token) {
            console.log('TOKEN:', token);
        },
        onNotification: function (notification) {
            console.log('NOTIFICATION:', notification);
        },
        permissions: {
            alert: true,
            badge: true,
            sound: true,
        },
        requestPermissions: Platform.OS === 'ios',
        popInitialNotification: true,
    });
}</span>
- create a new file src/handlers/notifications.js
<span class="has-inline-color has-black-color">import PushNotification from 'react-native-push-notification';

export const showNotification = (title, message) => {
    PushNotification.localNotification({
        channelId: 'channel-id-1',
        title: title,
        message: message,
    })
}
export const showScheduleNotification = (title, message) => {
    PushNotification.localNotificationSchedule({
        channelId: 'channel-id-1',
        title: title,
        message: message,
        date: new Date(Date.now() + 3 * 1000),
        allowWhileIdle: true,
    })
}
export const handleNotificationCancel = () => {
    PushNotification.cancelAllLocalNotifications();
}
</span>
- Import and initialize notificationsInit in App.js
<span class="has-inline-color has-black-color">import React from 'react';
import { View } from 'react-native';
import { notificationsInit } from './src/handlers/notificationsInit';

const App = () => {

  notificationsInit;

  return (
      <View>
      </View>
  );
};

export default App;</span>
- Now, lets display the notification
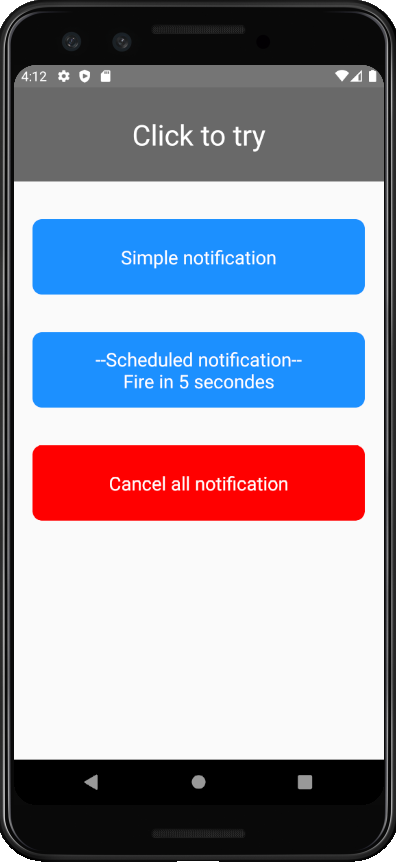
- create a new file src/components/TestNotifications.js
<span class="has-inline-color has-black-color">import React from 'react';
import { View, TouchableOpacity, StyleSheet, Text } from 'react-native';
import {
    showNotification,
    showScheduleNotification,
    handleNotificationCancel
} from '../handlers/notifications';

export default class TestNotifications extends React.Component {

    onTriggerPressHandle = () => {
        showNotification('Simple notification', 'simple notification triggered, nice work');
        console.log('simple notification triggered');
    }

    onSchedulePressHandle = () => {
        console.log('schedule notification triggered');
        showScheduleNotification('Schedualed notification', 'Schedualed notification triggered, nice work');
    }

    onCancelHandle = () => {
        handleNotificationCancel();
        console.log('cancel notification triggered');
    }

    render() {
        return (
            <View>
                <Text style={styles.title}>Click to try</Text>
                <TouchableOpacity
                    style={styles.button}
                    onPress={this.onTriggerPressHandle}>
                    <Text style={styles.text}>Simple notification</Text>
                </TouchableOpacity>
                <TouchableOpacity
                    style={styles.button}
                    onPress={this.onSchedulePressHandle}>
                    <Text style={styles.text}>{'--Scheduled notification--\nFire in 3 secondes'}</Text>
                </TouchableOpacity>
                <TouchableOpacity
                    style={[styles.button, {backgroundColor: 'red'}]}
                    onPress={this.onCancelHandle}>
                    <Text style={styles.text}>Cancel all notification</Text>
                </TouchableOpacity>
            </View>
        );
    }
}

const styles = StyleSheet.create({
    button: {
        backgroundColor: 'dodgerblue',
        height: 80,
        borderRadius: 10,
        margin: 20,
        justifyContent: 'center'
    },
    text: {
        color: 'white',
        textAlign: 'center',
        fontSize: 20,
    },
    title: {
        backgroundColor:'dimgrey',
        color: 'white',</span>
        <span class="has-inline-color has-black-color">textAlign: 'center',
        textAlignVertical: 'center',
        fontSize: 30,
        height: 100,
        marginBottom: 20,
    }
});</span>
- import TestNotifications component to App.js
<span class="has-inline-color has-black-color">import React from 'react';
import TestNotifications from './src/components/TestNotifications';
import { View } from 'react-native';
import { notificationsInit } from './src/handlers/notificationsInit';

const App = () => {

  notificationsInit;

  return (
      <View>
        <TestNotifications />
      </View>
  );
};

export default App;</span>
Try out the buttons to trigger the notifications
Feel free to clone and play with this project sample
https://github.com/aviadh314/RN-local-push-notification.git