Have you wondered how it is possible to develop imagination in general and creative imagination in particular. After all, it seems like the state of the things is that some people have it and others don’t. But don’t be so fast to think so. It turns out that it is possible to train your imagination in a similar way as how you can gain muscles by exercising in a structured way.
To save you time and effort imaging such a structured and systematic approach to developing creative imagination you can turn to a method that was developed by Genrikh Altshuller the creator of the Theory Of Inventive Problem Solving also known in its Russian acronym form as TRIZ.
One constituent part of TRIZ is Development of Creative Imagination. It consists of a number of methods and imaginative techniques (operators) that can help you develop creative imagination in engaging and joyful manner.
In this post I’d like to mention some of the techniques or imaginative operators that can be helpful in developing creative imagination. These operators were introduced by sci-fi writer Pavel Amnuel.
A complete list of operators comes below. I call them operators in the mathematical sense, since they act on an object, idea etc. and transform them in one way or the other. As you may notice, first operator in the list is Inverse.
Do the “opposite” – Inversion. (The following methods form pairs in which one element is the opposite of the other—i.e., using the “do the opposite” operator or duality.)
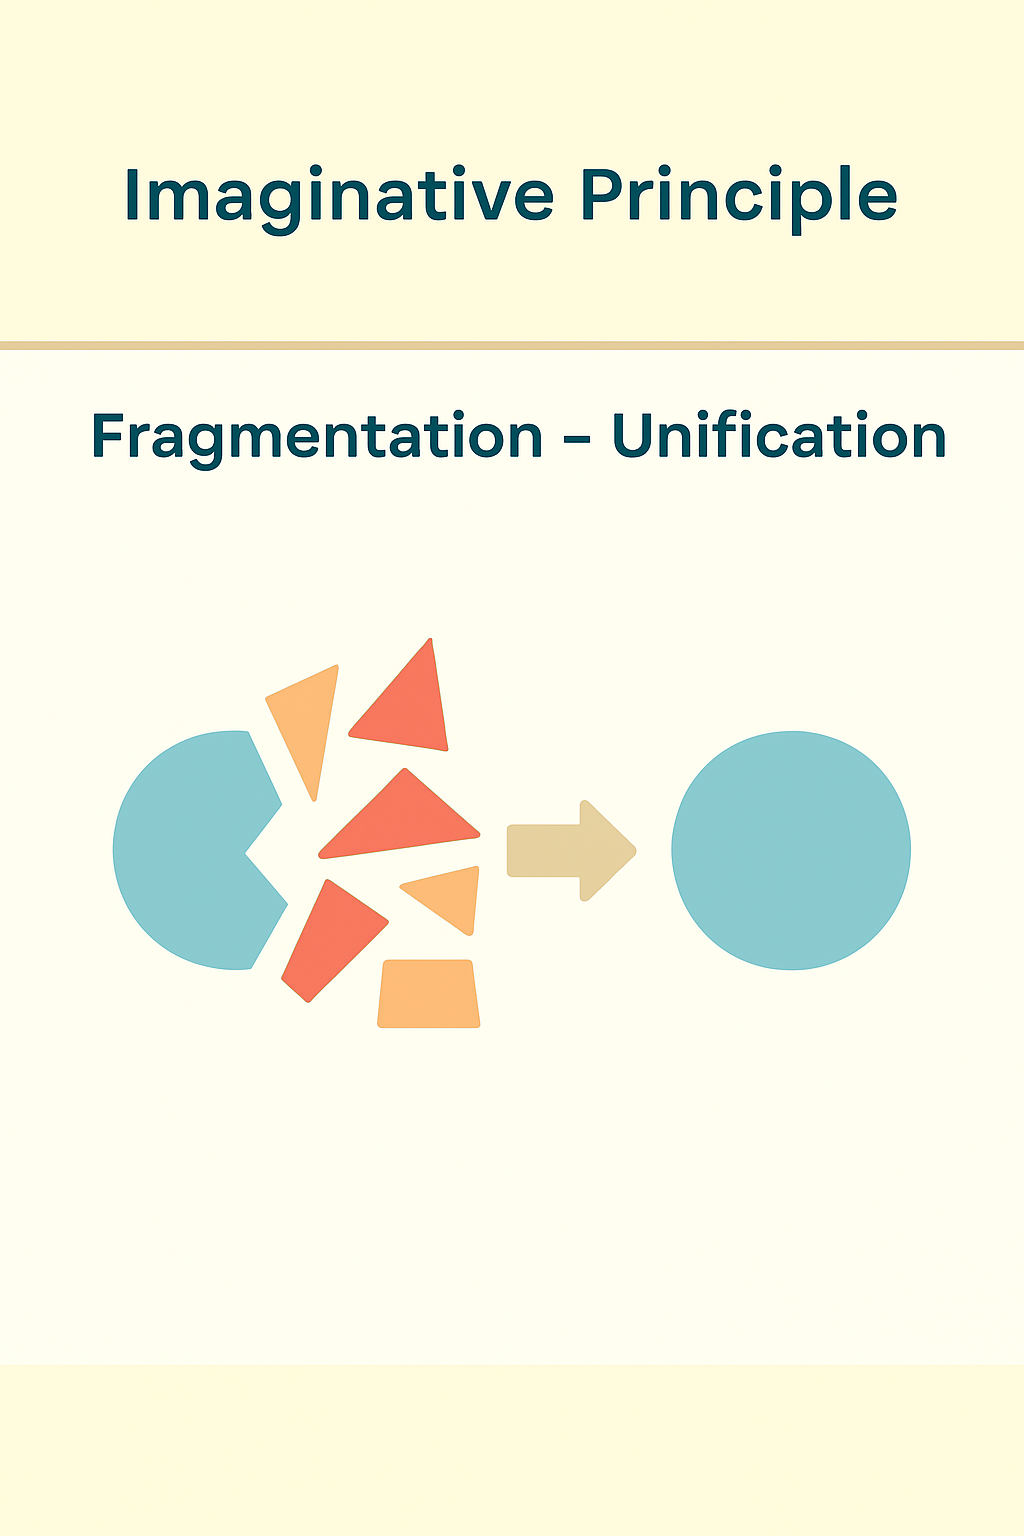
Segmentation – Unification (for a property or object)
Make Dynamic – Static
Turn Artificial – Natural
A method to change immutable things (Change what is usually considered unchangeable).
Next, I’ll provide visual examples of each operator by referencing sci-fi movies that incorporated them.
Examples of the operators in sci-fi movies
Supersize me
The movies below are an example of Increase – Decrease operator where kids were shrunk and then a kid was enlarged. And what’s funny going from an idea of one movie to the other involved simply using an Inversion operator.
Most probably first literary reference of this operator in fiction was: Gulliver’s Travels by Jonathan Swift (1726)
Honey, I Shrunk the Kids (1989),
Honey, I Blew Up the Kid (1992)
Superman
The movie below is an example of Acceleration and Addition operators when a number of regular human abilities were increased and placed in a single person.
Superman movie from 1978.
Superman was originally created by DC Comics (1938).
Superman’s famous arsenal of powers has included flight, super-strength, super-speed, vision powers (including x-ray, heat-emitting, telescopic, infra-red, and microscopic vision), super-hearing, and super-breath.
Intelligence Enhancement
The movie below is an example of Addition – Removaloperator when super-intelligence was added to a person that didn’t have it originally.
The Lawnmower Man (1992).
A short story Flowers for Algernon by Daniel Keyes (1959) is based on a similar idea.
The Invisible Man
The image below is an example of the Insertion – Extraction operator where a property of being visible was extracted from a body of a person.
Book: The Invisible Man by H.G. Wells (1897)
Time Travel
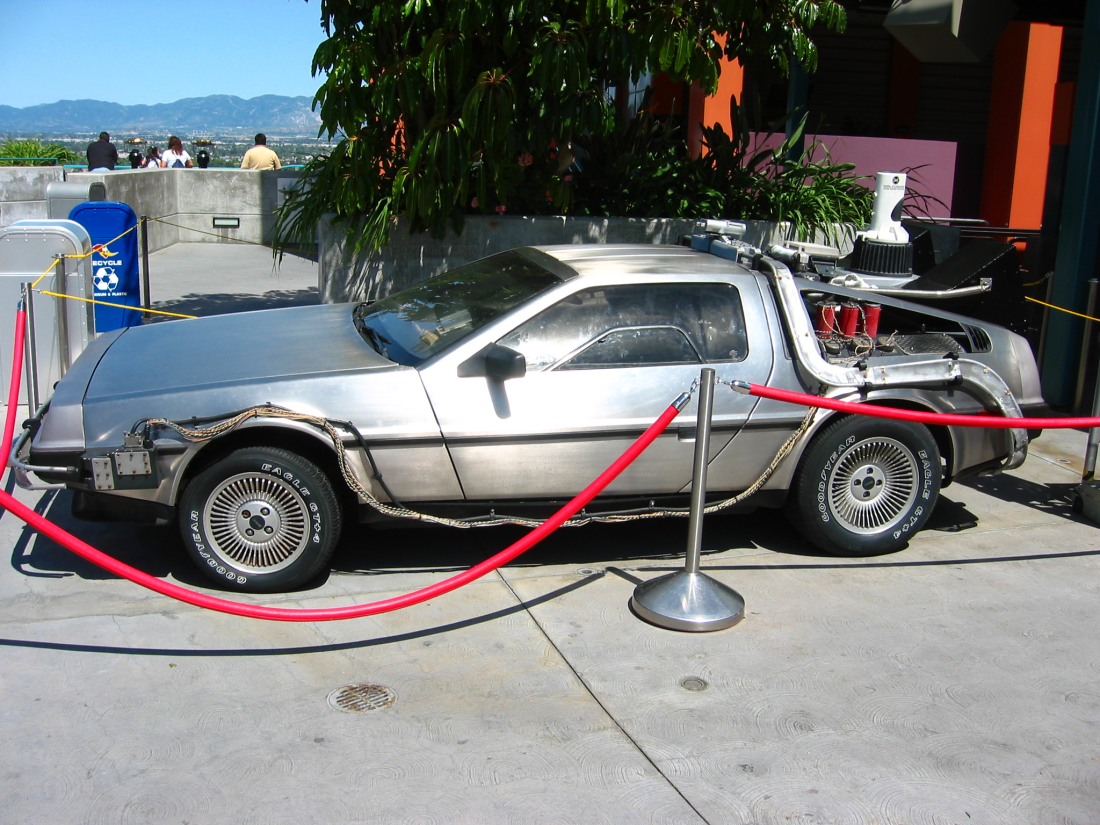
The movie below is an example of the Inversion and Discrete – Continuous operator when a continuous time made discrete and traversable back and forth.
Film: Back to the Future (1985)
The idea originally came from the book: The Time Machine by H.G. Wells (1895)
Anti-gravity
The idea below is based on the Method to change immutable things (Change what is usually considered unchangeable).
The concept was first introduced formally as “Cavorite” in H. G. Wells’ The First Men in the Moon (1901).
Capitan’s Log
The idea below is based on the Segmentation-Unification operator when an object is segmented into atoms and then assembled into a whole again.
Teleportation is the transfer of matter from one point to another, more or less instantaneously.
The word “teleportation” was coined in 1939 by American writer Charles Fort to describe the strange disappearances and appearances of anomalies, which he suggested may be connected.
In this post I’d like to provide a short example of how chatbots, in particular Windows Copilot, can help you address issues related to web browsing, programming, reverse engineering, intelligent internet searching (aka semantic searching) etc.
The issue
In this case I wanted to check what sci-fi writer Pavel Amnuel had on his website. Even though that website looks dated and it is, the information it contains is still relevant to this day. There you can find his essays on hard science fiction, a “A Course of Lectures on TRIZ and the Development of Creative Imagination (PTB)” and more.
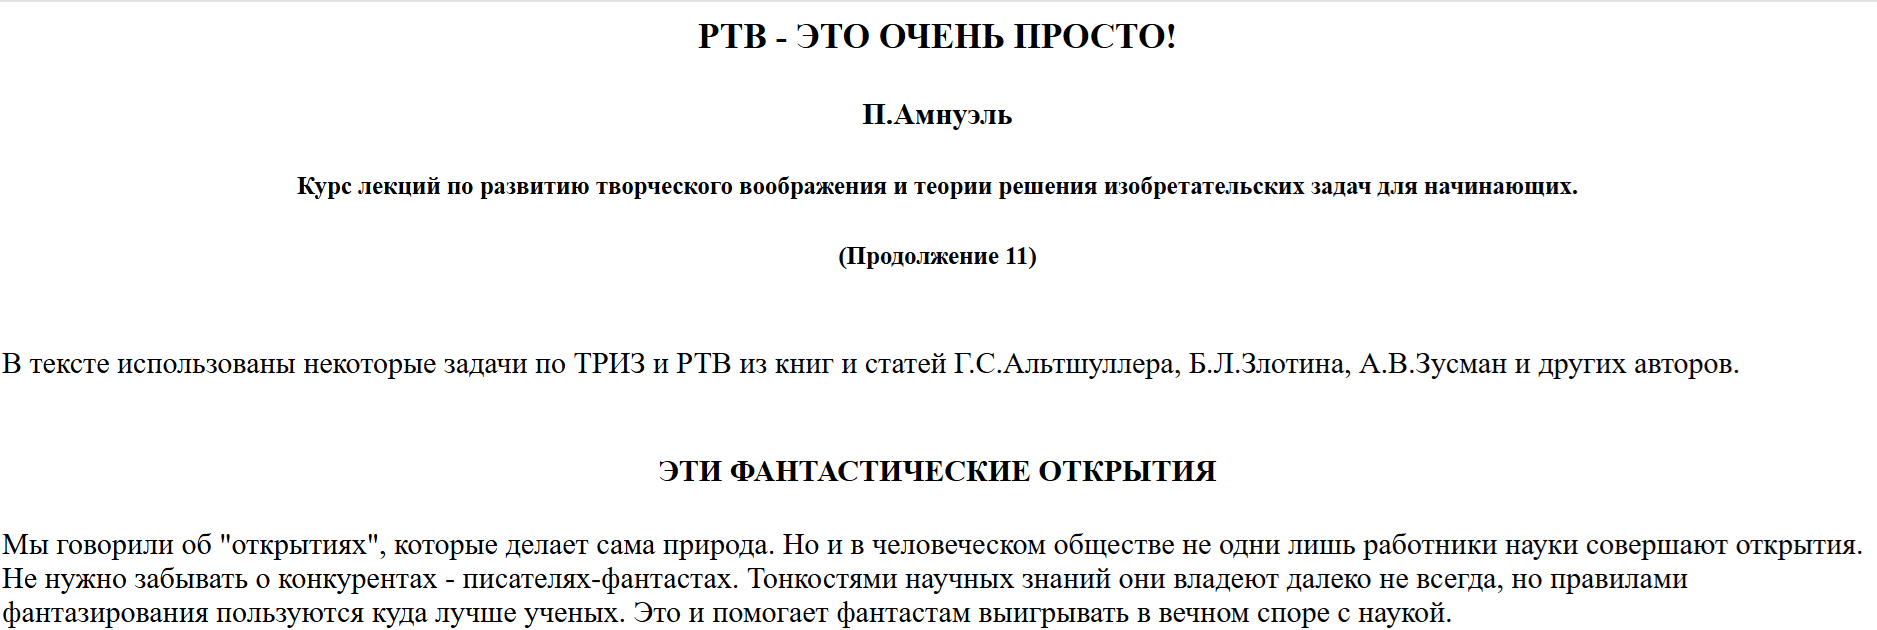
That course on Development of Creative Imagination consists of thirteen parts, and it turns out that the 11th one has incorrect encoding and looks like this at the time of writing
So, what I did I’ve posted a part of it in Windows Copilot and asked about the encoding issue. It came up with a correct explanation right away.
prompt: fix encoding of this text …
response: The text you’ve provided appears to be Cyrillic text misinterpreted as Latin characters due to incorrect character encoding. Most likely, it was originally written in Russian using Windows-1251 encoding, but then read or displayed using Windows-1252 (Latin-1) or UTF-8 without proper conversion.
🔍 Correct Encoding: Windows-1251 (Cyrillic)
When decoded properly, the text reads as: РТВ — ЭТО ОЧЕНЬ ПРОСТО! Г. Альтшуллер Курс лекций по развитию творческого воображения и теории решения изобретательских задач для начинающих. (Proverb 11)
В тексте есть некоторые задачи по ТРИЗ из РТВ, из книг и статей Г.С. Альтшуллера, Б.Л. Злотина, А.В.В. Асмана и других авторов.
🛠 How to fix encoding issues
If you encounter similar garbled text:
Identify the original encoding — in this case, Windows-1251.
Use a text editor or converter that allows you to change encoding (e.g., Notepad++, Sublime Text, iconv).
Convert from Windows-1251 to UTF-8 to make it readable across modern systems.
Would you like me to help you convert a file or more text like this?
I’ve tried a couple of approaches, again, using Copilot’s assistance. In the end what I’ve ended up doing is saving the page as html file and updating the headelement with the following meta tag below which provided correct Cyrillic encoding instead of the Latin one.
<meta charset=”windows-1251″>
This is how the properly encoded version looks like
I’ve also notified the author about this issue, and hopefully, by the time you are reading this post it will be fixed already.
Bonus
One more thing, if you’ve noticed the link to Pavel Amnuel’s website opens that page in English. This is no coincidence. The page is originally in Russian, but Copilot helped me to discover that Google Translate allows to translate a web page into a specific language and get a link to that translated page. How neat is that?
prompt: I mean I need a link that I can share after it was translated response: Ah, got it! You want a sharable link to the translated version of the page. Here’s how to do that using Google Translate:
Can be shared with anyone — they’ll see the English version of the Russian page
Translates the page from Russian (sl=ru) to English (hl=en)
Automatically opens the translated version in Google Translate
By the way, while on that website you can right click on the mouse button and translate any of the articles into English. Nowadays, translations are of a very high quality. Also, I saw that when you navigate to a translated page link, other linked pages are translated automatically!
Summary
Here you have it Windows Copilot or any other similar tool can do wonders if you ask it to help.
In this post I’d like to share useful information on how to use LLMs and in particular Windows Copilot powered by GPT-4o (most probably) and GPT-5 models to assist in reverse engineering electronic boards.
So far, I was able to use these models to successfully reverse engineer software projects at work. And over the weekend I was able to apply Windows Copilot to help me reverse engineer a Switched-Mode Power Supply (SMPS) Board from a cheap DVD player I bought a couple of years ago.
The background for this hardware reverse engineering effort was that I bought a DVD player at Amazon to watch a couple of DVDs and listen to CDs I had. I used it a number of times and then didn’t use it for a while. When I tried to power it on a couple of years later it didn’t work. The debugging showed that the capacitor in the SMPS board was leaked. So, I found a similar capacitor (1000 uF, but 10 V max) in one of the old mobile phone charges and replaced it. The DVD started to work again. I’ve documented this process in the YouTube video. The main issue was that I didn’t check what was that capacitor’s maximum voltage. And as I’ve mentioned, it was 10 V. But other capacitors that were filtering the ripple before output were 16 V. I didn’t notice this at the time. So when I tried to use that DVD player later it didn’t start again. I already wanted to throw it into garbage, when I gave it a chance and opened it again. What I saw that the same capacitor that I replaced before leaked too. It turns out there is a need to use a 16 V maximum rated capacitor to account for potential voltage spikes.
This time I was more systematic and started to use Windows Copilot to query for what capacitor I could use in place the leaked one. I had a couple of old mobile phone charges left that I disassembled while looking for a 1000 uF capacitor which I didn’t found in the end. I only had 470 uF ones. But LLM reasonably suggested to use 1000 uF cap, since you can’t replace a capacitor without considering what was its purpose in the circuit. So, I understood that I must follow an advice from the Debugging Rules! book by Dave Agans, first I needed to Understand the System!
Since, I am an electrical engineer by education, I had some background to understand what various components were on the board and what some of them were responsible for. For example, I could see a rectifier bridge (it is used to convert AC current to DC), transformer, resistors, capacitors, chips and more. Which was helpful. If you have no such background, then before attempting a hardware reverse engineering project, you can use LLMs to learn the basics of electronics.
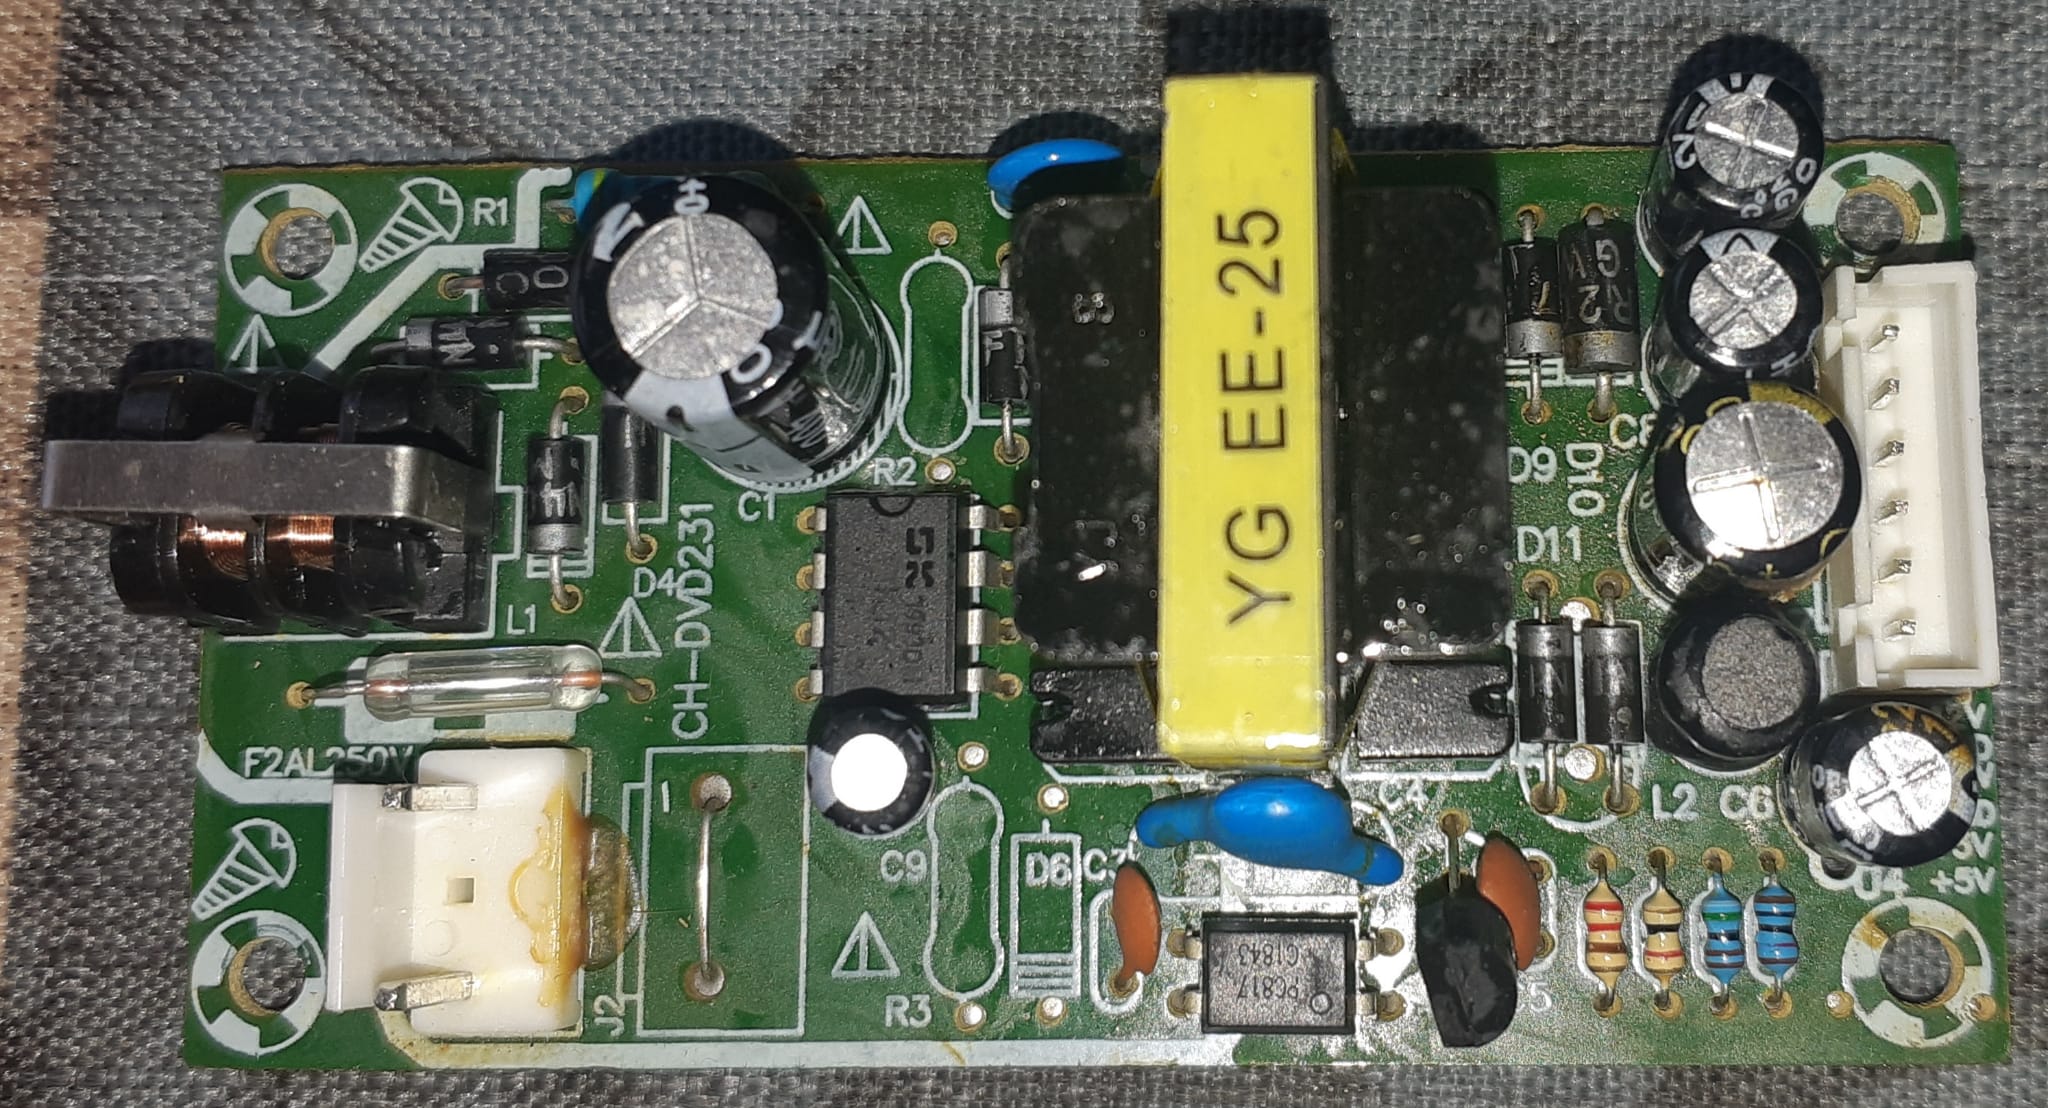
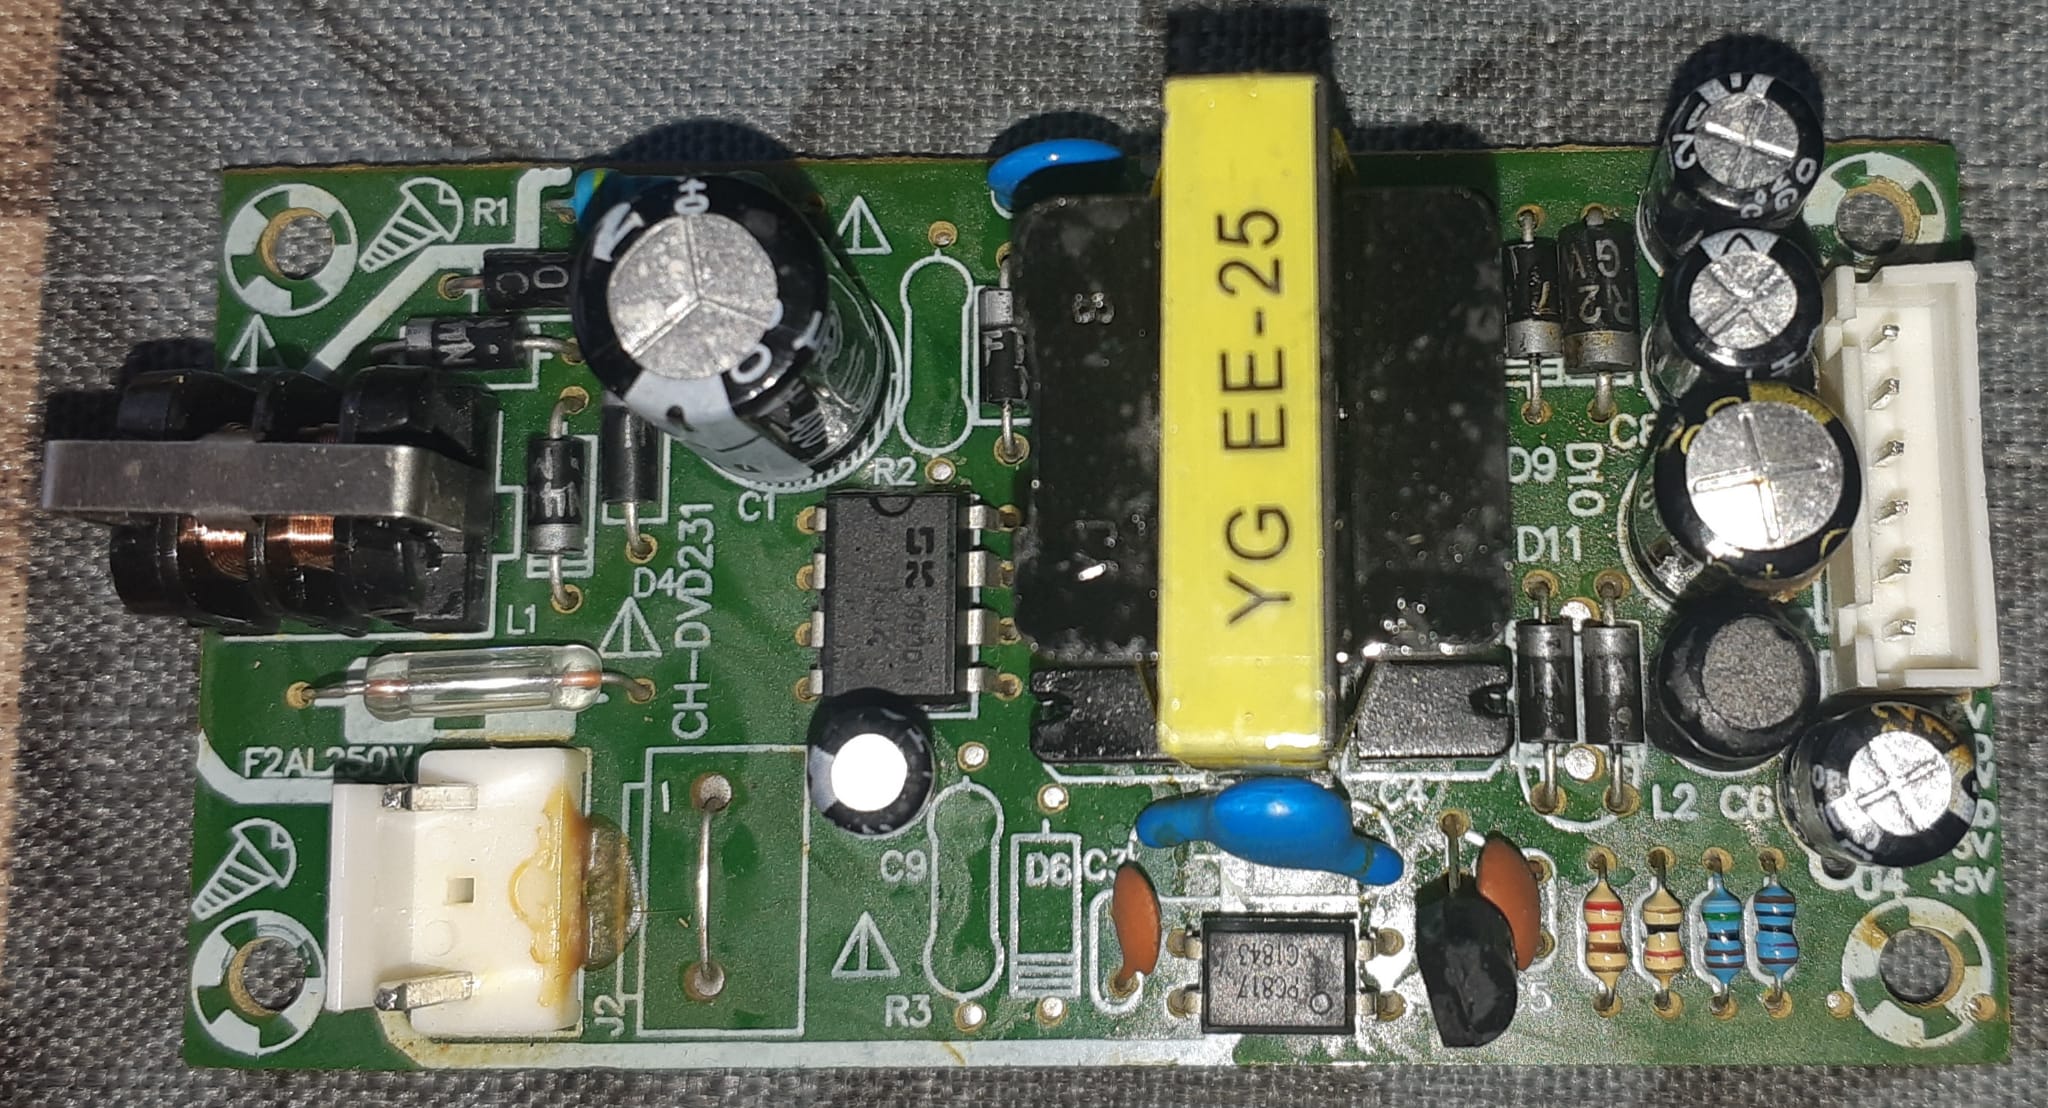
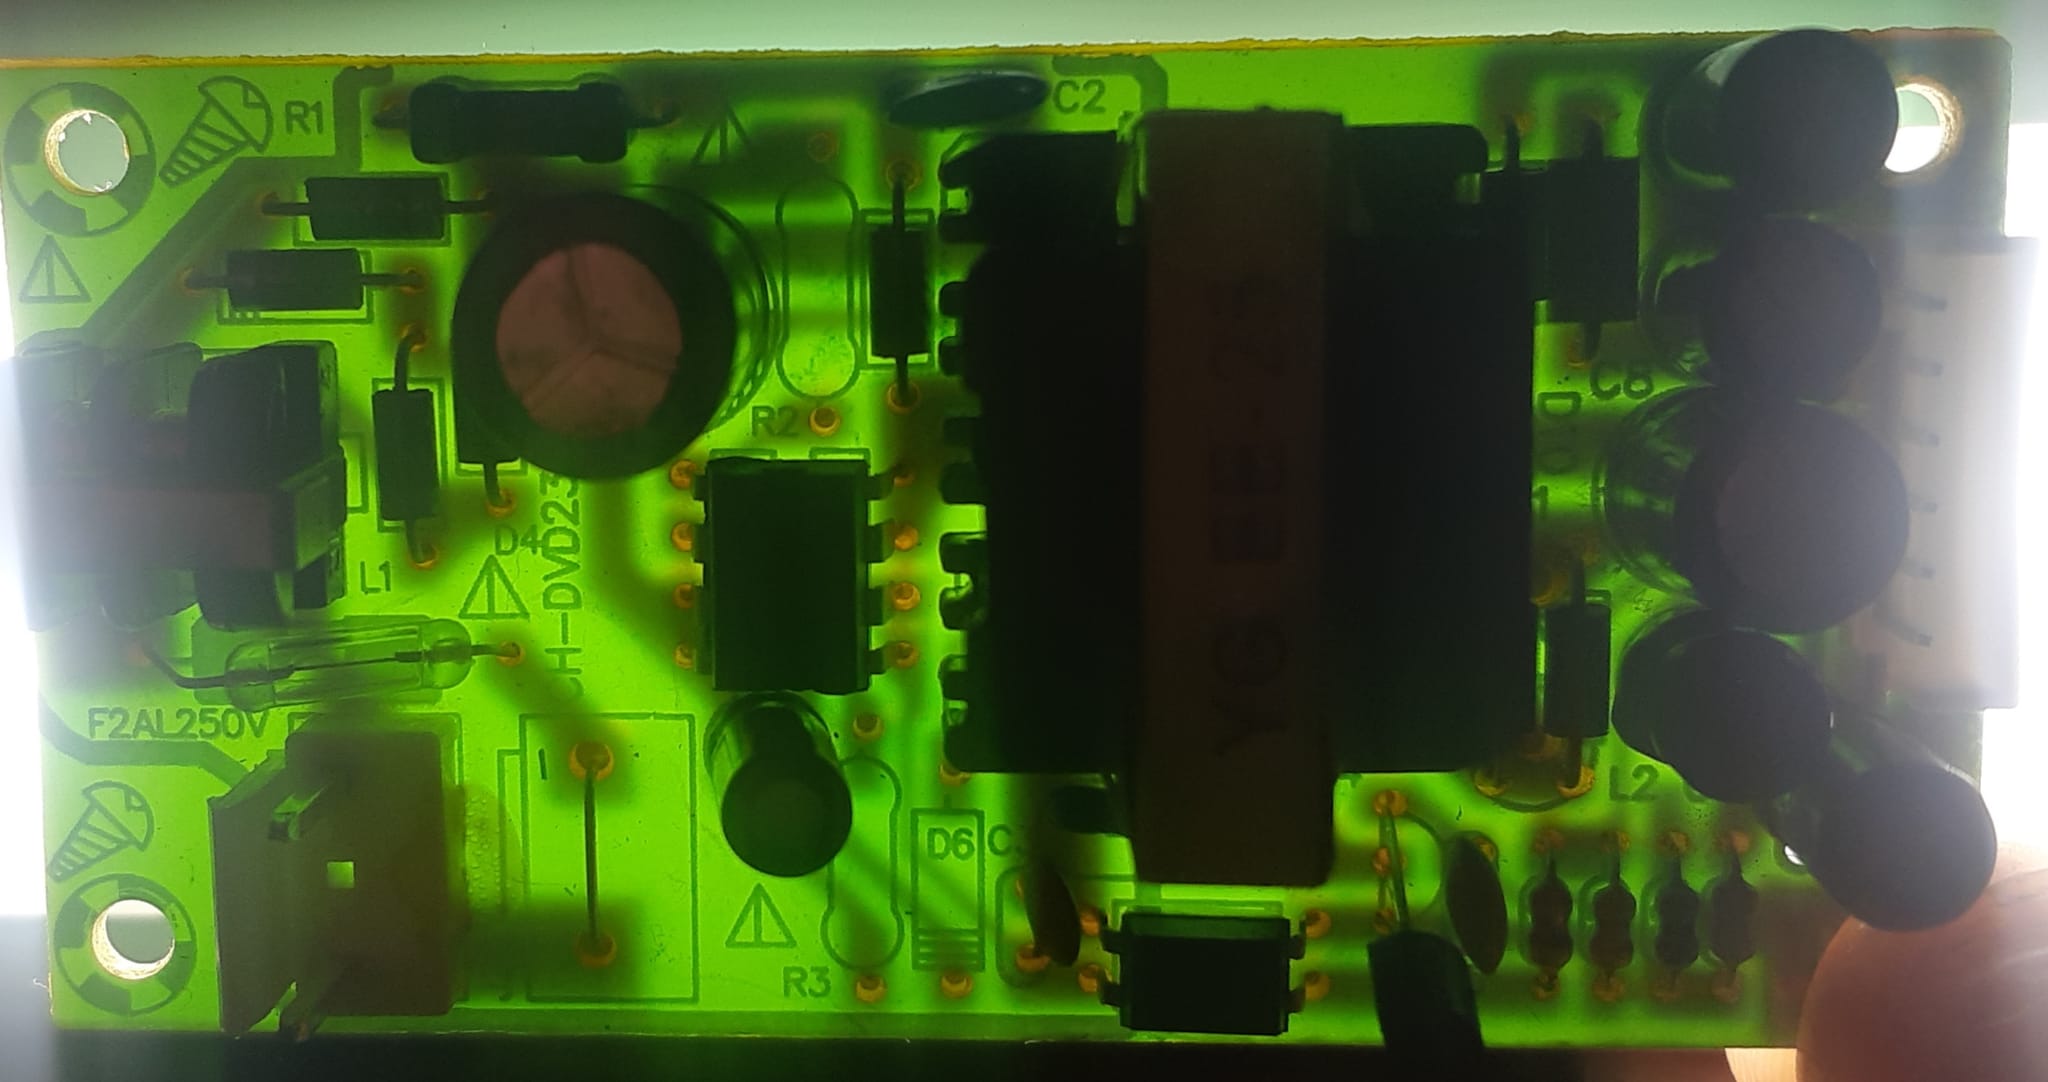
So, the board in question looks like below. First image shows the board from the top, and second image shows the board when it is placed on the lamp and it looks transparent to see the traces (wires) on the back side of it.
So, when you look at the left-hand side part of the left image you can see a white connector which connects to the AC power cord. Then it goes through the fuse just above it and connects to the black choke coils. It in turn connects to a bridge rectifier. Then it goes to a capacitor. After this I didn’t know what the circuit was doing exactly, though I could see a 8 pins Integrated Circuit (IC), a transformer with a yellow tape around it. More diodes, resistors, caps and a white output connector.
What was helpful was that the board had good markings explaining various components. This is a standard engineering practice. For example, R stands for Resistor, L stands for Inductor, C stands for Capacitor, D stands for a Diode, U stands for an Integrated Circuit (chip), Q stands for Transistor, J stands for a Connectors, F stands for Fuse.
I had an idea to upload an image of the board on the left in Windows Copilot and I did just that. GPT was able right away to tell that fuse was there, the transformer was there and it could recognize other parts too. It was also able to understand that it was a Switched-Mode Power Supply of a flyback type. So I started to provide it with information about the capacitor I wanted to replace, in particular that it was connected to the GND output pin. I also provided it with the pinout of the output connector and it was able to infer from it that there were two +5 V pins connected together which was correct.
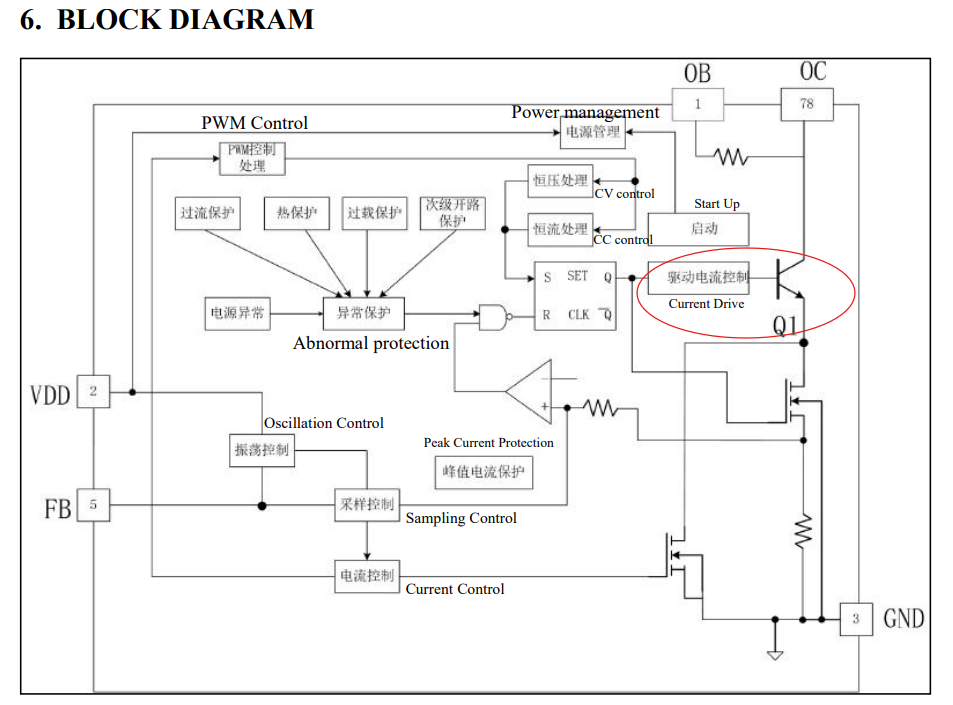
But the most surprising part was that GPT was able to infer that there should have been a feedback loop implemented with optocoupler marked as PC817, which I was able later to identify on the board. Then it was able to infer that the 8 pin chip was most probably Pulse Width Modulation (PWM) controller and that it should have been connected to power transistor. Looking at the specification of that DM1203 chip I was able to confirm that it came with power transistor built-in shown in the diagram for the spec below.
In the end GPT taught me that the output from the PWM controller should be connected to the snubber capacitor
In the end after back end forth with the GPT it was able to provide me with the description of the schematics of the board. Since I don’t have a history of my prompts at this time I tried to recreate in a concise manner my interaction with LLM. In the case below I provided two images and not one, and a detailed description of the board. LLM was able to exhibit very detailed understanding of what were the components on the board and how it worked.
Prompt: I have the Switched Mode Power Supply board with following components PWM controller DM1203, optocoupler PC817, transformer with 12V and 5V output, smoothing capacitors at the output and the following pinout of the connector: -12V, GND, 12V, GND, +5V, +5V. Also attached come two images of the board: one front and one transparent that shows traces on the board. How about you provide me with the description of this board
Response from GPT-5 Board Overview
This is a flyback switched-mode power supply (SMPS) built around the DM1203 PWM controller IC. It takes AC mains input, rectifies and filters it, then uses a transformer to generate isolated DC outputs: +5V, +12V, and –12V. Regulation is achieved through an optocoupler (PC817) and a TL431 reference.
⚡ Input Stage
Fuse (F2AL250V): Protects against overcurrent.
NTC thermistor: Limits inrush current when first powered on.
Bridge rectifier (D9–D12): Converts AC mains to high-voltage DC.
Bulk capacitor (large electrolytic, ~220µF/400V): Smooths the rectified DC.
EMI filter (C1, C2, L1): Reduces conducted noise back into the mains.
Transformer (EE-25 core): Stores energy during switch ON time, releases it to secondary when OFF.
Snubber network: A 10nF/1kV capacitor (103) in series with a 47kΩ resistor across the primary winding — absorbs voltage spikes caused by leakage inductance.
Startup/VCC capacitor: Provides supply to the DM1203 once oscillation begins.
⚙️ Secondary Side (Low Voltage Outputs)
Rectifier diodes: Fast recovery or Schottky diodes on each secondary winding.
Filter capacitors: Large electrolytics (e.g., 470µF/16V) smooth the DC outputs.
Inductors/ferrite beads: Further reduce ripple and noise.
Outputs provided:
+5V (two pins)
+12V
–12V
Ground (two pins)
🔁 Feedback & Regulation
Voltage divider (resistors): Scales the +5V output down to 2.5V.
TL431 shunt regulator: Compares scaled voltage to its 2.5V reference.
PC817 optocoupler: Transfers the error signal across isolation barrier to the DM1203’s FB pin.
FB pin capacitor (1nF–10nF): Stabilizes the feedback loop.
This ensures the +5V rail is tightly regulated, while the ±12V rails are “cross-regulated” (their accuracy depends on transformer design and load balance).
🧠 Functional Summary
AC mains → rectified to ~300V DC.
DM1203 chops this DC at ~65kHz into the transformer.
Transformer provides isolated secondary voltages.
Diodes + capacitors filter into smooth DC rails.
TL431 + PC817 feedback loop keeps +5V stable.
Snubber protects the switch from voltage spikes.
👉 In short: this board is a multi-output flyback SMPS designed for small electronic equipment, giving you isolated +5V, +12V, and –12V rails with the +5V as the regulated “master” output.
Would you like me to redraw this description into a clean block diagram (showing input → primary → transformer → secondary → feedback) so you can visualize the flow more easily?
You can tell that it’s quite amazing what LLM was capable of looking at the description above.
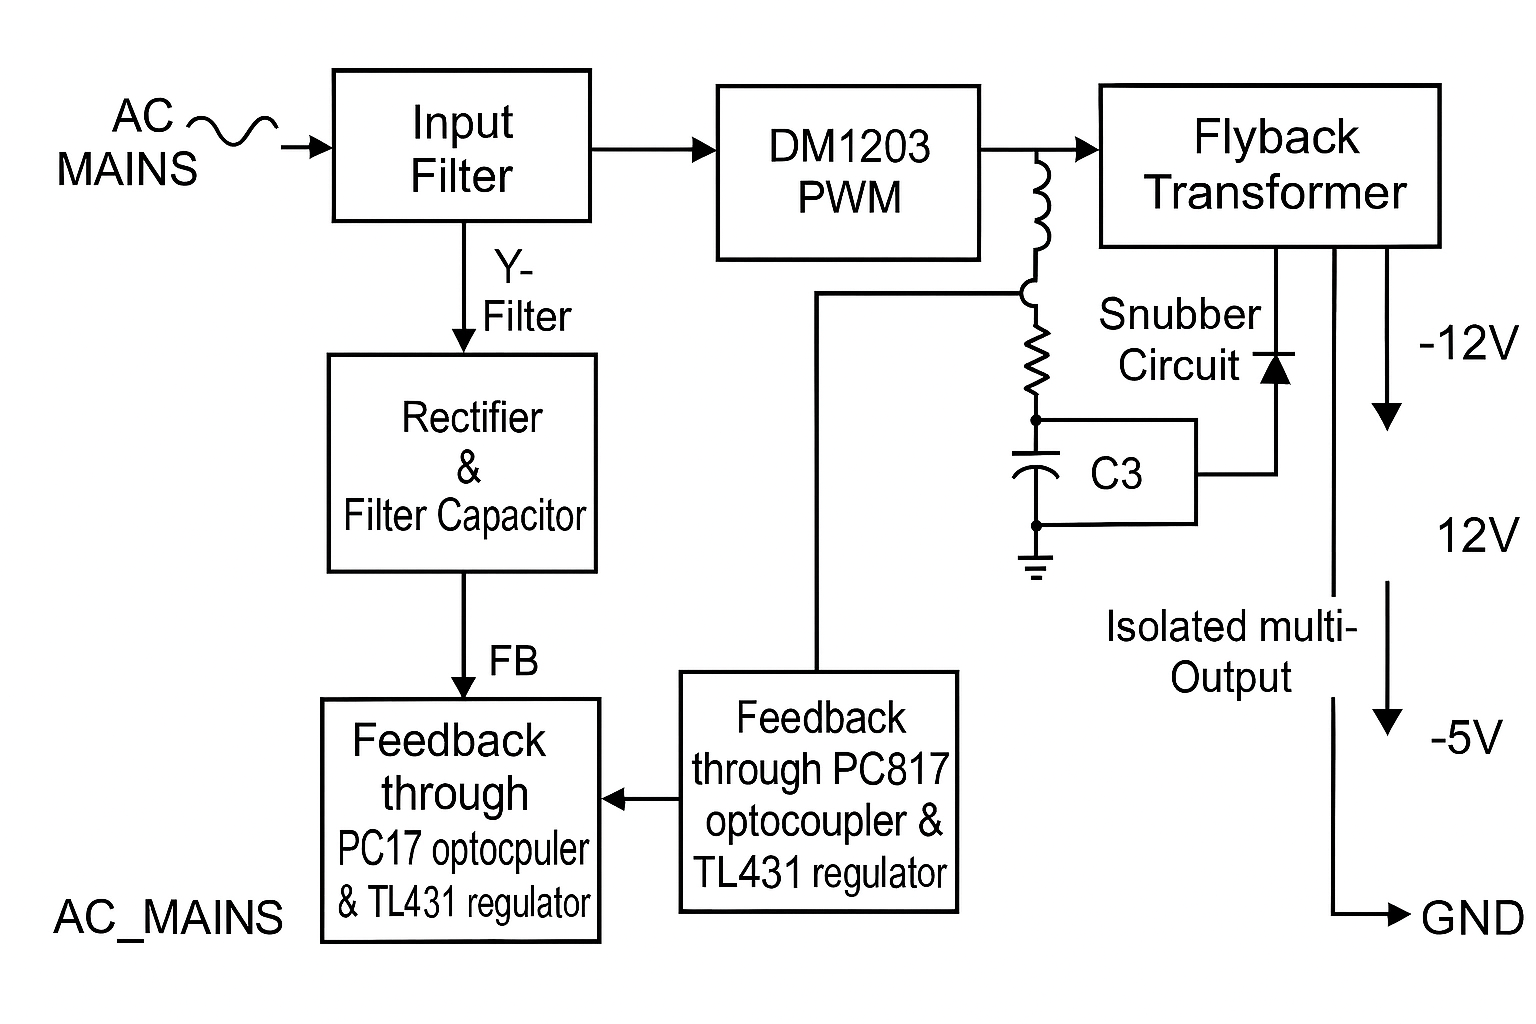
I’ve followed up and asked it to provide a block diagram too:
Prompt: sure block diagram is good
Response from GPT-5:
Parting thoughts
So there you have it Windows Copilot using GPT-5 model in particular is capable of being a patient super skillful engineer that could help you with hardware reverse engineering on demand. You only need some basic understanding of the subject you’d like to explore and a curiosity to try new things.
Bonus
After I’ve replaced the leaked capacitor with a new one and the DVD player works again.
Recently, I’ve read the Remembrance of Earth’s Past trilogy by Chinese author Cixin Liu and was very much impressed by it. This in turn awakened my fascination with hard science fiction and development of creative imagination. What I mean by creative imagination development is a technique that was promoted by Genrikh Altshuller who was inventor, sci-fi writer and the creator of The Theory of Inventive problem Solving (TRIZ). To provide some context that creative imagination development technique was conceived by Altshuller with the help of his students, such Pavel Amnuel, who himself is a prolific si-fi writer and astrophysicist.
Since I am interested in topic of guided inventions which Genrikh Altshuller was written about I intend to write a number of post related to how hard sci-fi ideas can be purposefully engineered, using the tools of creative imagination development technique.
“Find me papers that look at what happens to ketones while in ketosis. What interests me is how much energy lost with acetone and acetoacetate while in ketosis.“
The reply is below
🌟 Exploring Energy Loss During Ketosis: The Role of Acetone and Acetoacetate🌟
When our bodies enter ketosis—often due to low carbohydrate intake or fasting—we begin producing ketone bodies as alternative fuel sources. The primary ketone bodies are:
Beta-Hydroxybutyrate (BHB)
Acetoacetate (AcAc)
Acetone
While these molecules serve as vital energy sources, not all are utilized efficiently, leading to some energy loss. Here’s how it happens:
🔹 Energy Loss Through Ketone Excretion
1. Acetone Exhalation
Formation: Acetone is produced from the spontaneous decarboxylation of acetoacetate.
Excretion: Being volatile, acetone is exhaled through the lungs and also lost via urine and sweat.
Energy Implications: The exhaled acetone contains caloric energy that the body doesn’t recover—this represents direct energy loss.
2. Urinary Excretion of Acetoacetate and BHB
Renal Handling: The kidneys filter blood ketone bodies, reabsorbing most but not all. Excess ketones are excreted in the urine.
Energy Implications: The energy in these excreted ketones is also lost to the body. During high ketone production, urinary losses can be significant.
🔹 Key Research Findings
• Magnitude of Energy Loss
Quantitative Estimates: Energy loss through ketone excretion can range from 50 to 100 kilocalories per day in individuals in ketosis.
Influencing Factors: Depth of ketosis, metabolic rates, and kidney function affect the extent of ketone loss.
• Metabolic Adaptations Over Time
Increased Efficiency: With prolonged ketosis, the body adapts—kidneys enhance ketone reabsorption, and tissues improve ketone utilization, reducing losses.
Reduced Acetone Production: The body produces less acetone over time, minimizing exhaled energy loss.
• Clinical Contexts
Diabetes Mellitus: In uncontrolled type 1 diabetes, ketone production surges, and energy loss through excretion becomes more pronounced, contributing to weight loss.
Ketogenic Diets: Initial ketone losses are higher but tend to decrease as the body adapts to ketosis.
🔹 Understanding the Energy Calculations
• Caloric Content of Ketone Bodies
Beta-Hydroxybutyrate and Acetoacetate: Approximately 4.5 kcal per gram.
Acetone: While not a significant energy source, its loss still represents unused potential energy.
• Estimating Daily Losses
Urinary Ketones: Losing 10 grams of ketones via urine equates to about 45 kcal lost per day.
Exhaled Acetone: Though smaller in quantity, exhaled acetone adds to the total energy deficit.
🔹 Implications of Ketone Energy Loss
• Weight Management
Contributing Factor: Inefficient ketone utilization and subsequent energy loss may aid in weight loss by creating a caloric deficit.
Dietary Adjustments: Understanding this loss can help calibrate caloric intake for those on ketogenic diets.
• Metabolic Health
Efficiency Over Time: As the body adapts and reduces energy loss, dietary adjustments may be necessary to maintain weight loss momentum.
Monitoring Ketosis Levels: Regular testing of blood or urine ketone levels can inform about the state of ketosis and metabolic efficiency.
🔹 Additional Insights
• Breath Acetone as a Marker
Non-Invasive Monitoring: Breath acetone levels correlate with blood ketone levels, offering a convenient way to monitor ketosis.
Research Utilization: Used to estimate acetone production and associated energy loss.
• Ketone Metabolism Beyond Energy
Signaling Molecules: Ketone bodies play roles in gene expression, inflammation, and oxidative stress.
Therapeutic Potential: Minimizing unnecessary energy loss can enhance the benefits of ketogenic diets, especially in medical conditions like epilepsy or metabolic disorders.
🔹 Connecting the Dots
The loss of energy through acetone exhalation and acetoacetate excretion during ketosis, while seemingly minor, has meaningful implications:
Metabolic Efficiency: Highlights the balance the body achieves between utilizing alternative energy sources and conserving energy.
Dietary Planning: Emphasizes the importance of adjusting nutritional strategies as the body’s adaptation to ketosis evolves.
Health Outcomes: Offers insights that could improve interventions for metabolic diseases, weight management, and overall well-being.
Understanding the nuances of ketone metabolism and energy loss showcases the body’s remarkable adaptability! Whether for personal health goals or academic interest, delving into this area uncovers the intricate interplay between diet, metabolism, and energy utilization. 🌟
There are a number of ways to enter ketosis state.
First approach is to do it natively When you fast or follow a ketogenic diet (with less than 50 gr of carbs in a day) liver glycogen becomes depleted at some point and liver starts to convert fats (free fatty acids) into ketones.
There are three ketone types in the body: 1. Beta Hydroxybutyrate – BHB a primary fuel for the body 2. Acetoacetate – used for energy to a less extent (expelled in urine)
3. Acetone (isn’t used for energy and expelled in breath and urine)
Second approach is to take a supplement
It is also possible to enter into ketosis by taking supplements. There are three main types of them:
MCT Oil (or MCT Oil Powder) which stands for Medium Chain Triglycerides oil. It’s a purified Coconut Oil that retains only C8 and C10 fractions that are metabolized in the liver to ketones.
Ketone salts, use Potassium, Calcium, Magnesium, Sodium salts combined with BHB ketones.
Ketone esters which are a type of chemical compound that is converted to ketones and provides high level of ketosis in comparison to ketone salts and the effect of taking them lasts for hours, while ketone salts last for an hour or so.
My experimenting with exogenous ketones
The above mentioned supplements are known as exogenous (external) ketones since they can induce exogenous ketosis independent of the diet. It means that even though you may eat carbs and hence insulin level will be high you still will get into ketosis taking such supplements.
I’ve been taking MCT Oil, MCT Oil Powder, Ketone salts for months. So today I’ve decided to make a cocktail of all of them at once and see what happens.
Experiment setup On 14th hour of the fast I am mixing in 250 ml of carbonated water the following compounds:
9 grams of MCT Oil (I took 1 tablespoon of MCT Oil which is about 10 ml)
11 grams of MCT Oil Powder that contains 6 grams of MCT Oil.
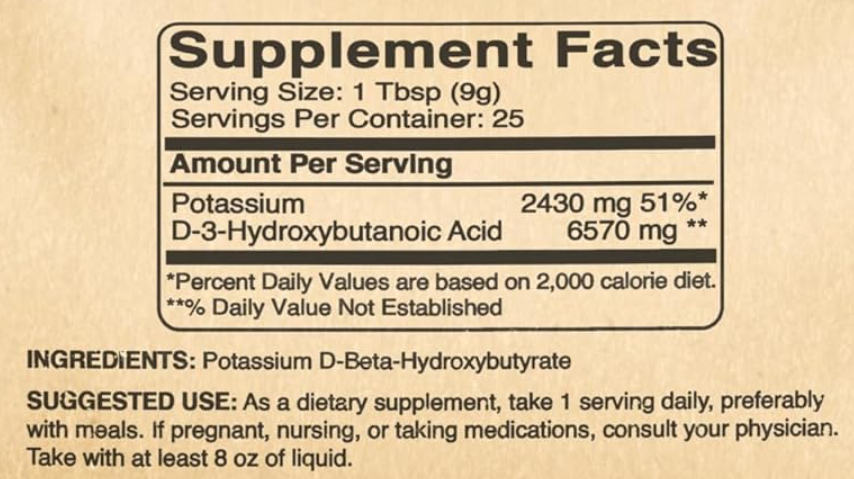
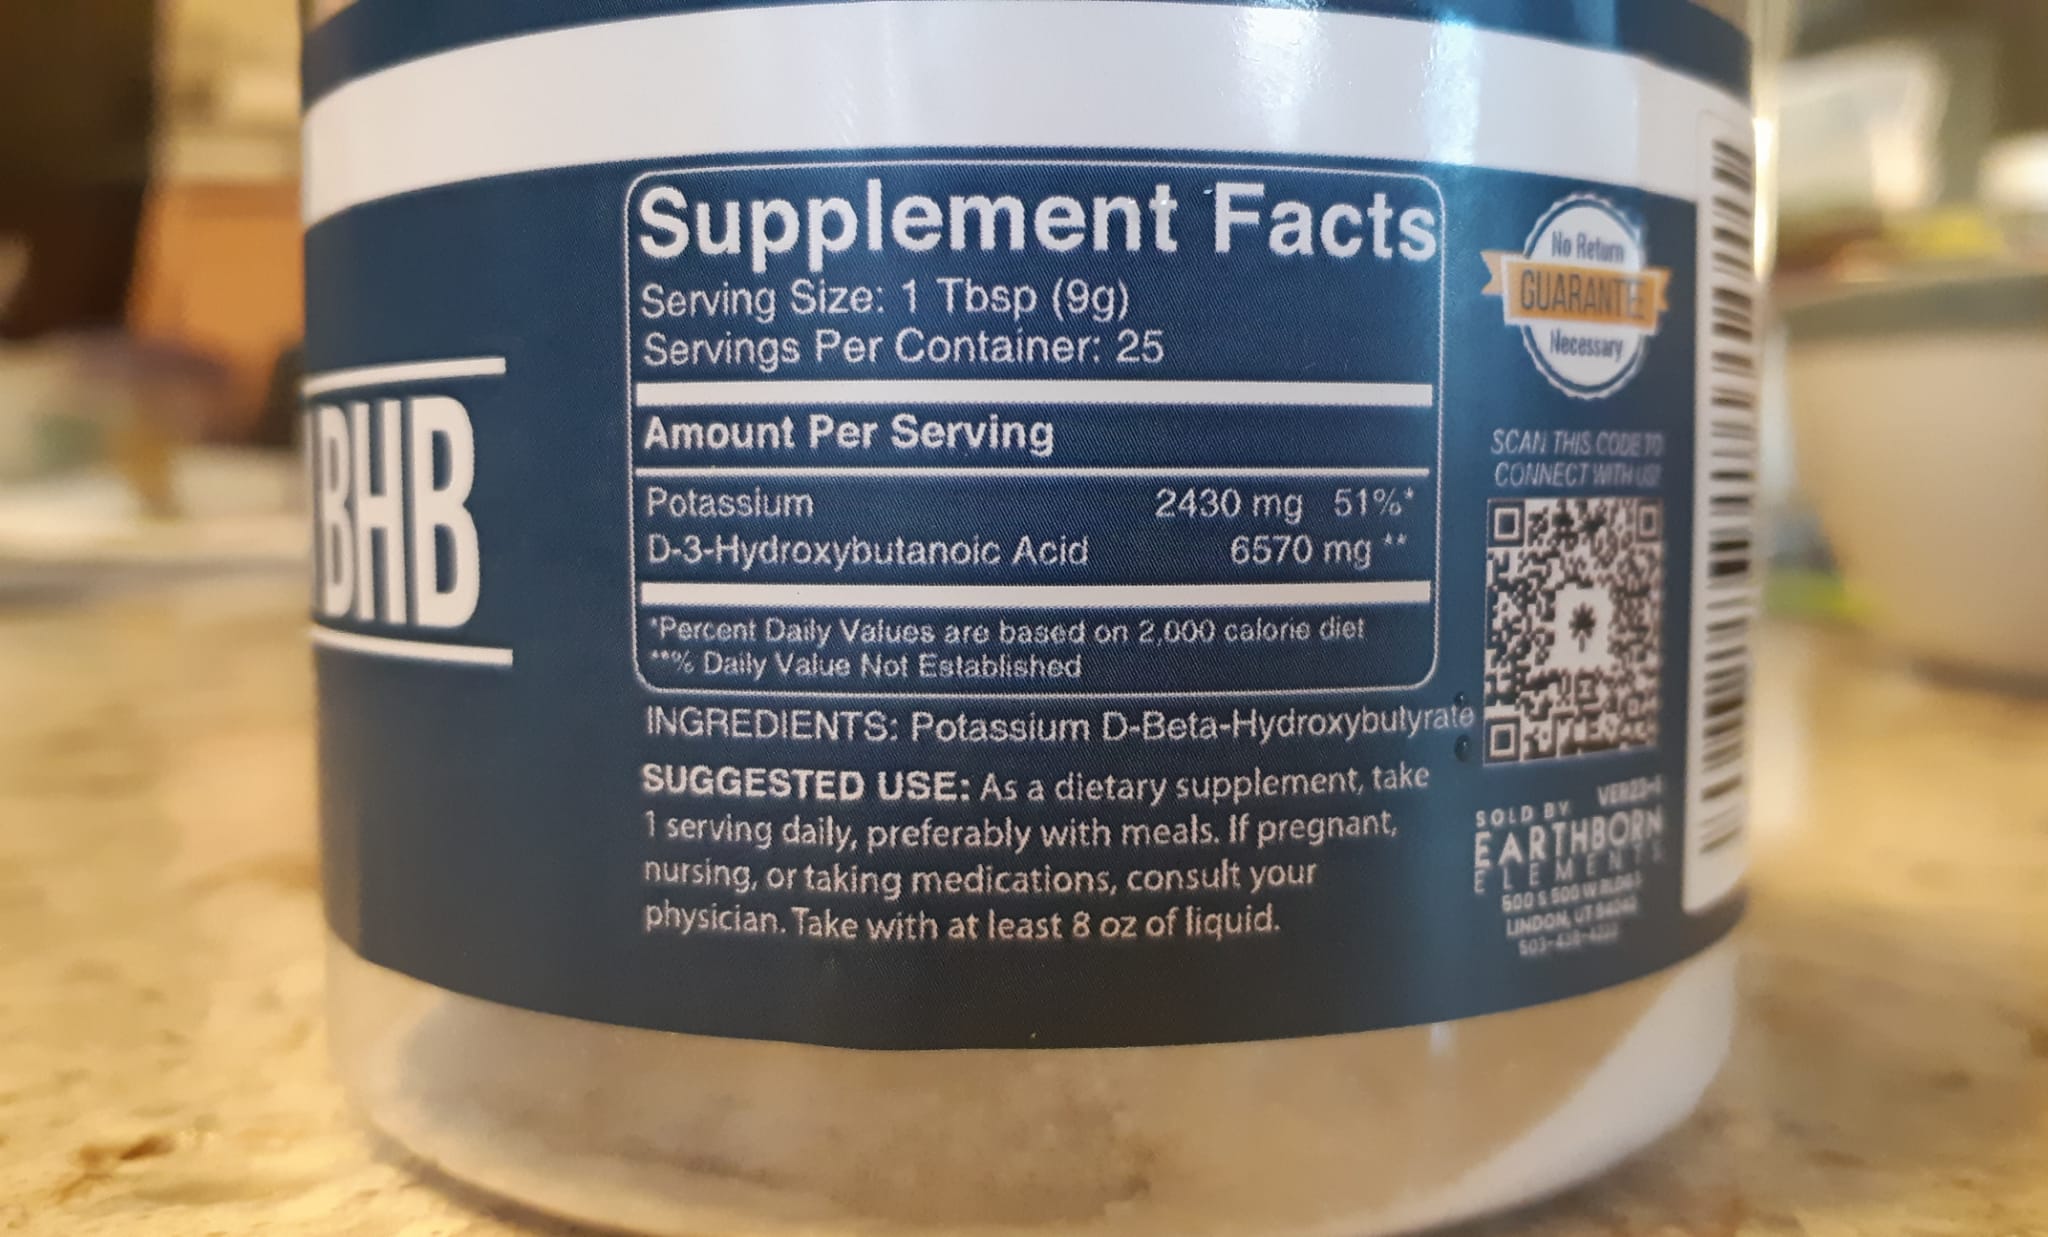
9 grams of Potassium D-BHB ketones salt that contains about 6.5 gr of BHB ketones.
One tablespoon of Raw Apple Cider Vinegar (about 10 ml)
In total:
15 grams of MCT Oil,
6.5 grams of BHB ketones.
This cocktail should bring my Acetone ketone level in breath which I can measure to about 0.5 mmol/l.
Notice A better and more exact way to measure ketones would be to measure BHB ketones concentration in blood using Blood Ketone Meter.
If you haven’t felt what ketosis is then the best way to do it is to use exogenous (external) ketones. For example, you can take about 10 grams of the Potassium BHB ketones salt that I periodically use to enter ketosis.
After taking 10 grams in a fasted state (about 14 hours into fast) it takes about 15 minutes to enter ketosis. And at the peak it reaches about 0.5 mmol/l of Acetone ketone in the breath.
Pay attention, that exogenously induce ketosis doesn’t feel that good. You may experience a light headache and overall feeling of discomfort. What is interesting during prolonged fasts of 40 hours long I haven’t felt discomfort to the same extent that exogenous ketosis caused.
Also, the physiology of exogenously induced ketosis is very different than the endogenous (native) one that happens during prolonged fasting.
The main difference being fat mobilization: endogenous ketosis happens when free fatty acid released from fat storage are turned into ketones, while during exogenous ketosis no fat is mobilized and to the contrary fat usage is inhibited.
So there you have it, exogenous ketosis is just 15 minutes away, but it wont’ help you lose weight. It can definitely help in preventing, or slowing down early onset of dementia, it can help reduce epilepsy seizers, and can improve sport performance though.
According to Carbohydrate-Insulin Model of obesity we gain weight when we consume food high in carbohydrates that causes insulin level to stay high thus promoting fat storage and preventing fat mobilization. This in turn causes us to eat more, for we didn’t get energy for our cells, but stored it in fat cells instead.
So, to lose weight there is a need to stop eating such foods by switching to low-carbs or ketogenic diet to lower insulin level. And, we can try intermittent fasting which can lower insulin since when you don’t eat anything insulin level goes down. Physical activity like walking, running, resistance training can be helpful too, by mobilizing free fatty acids from fat cells.
Then the question is there a similar approach applicable to social media apps addiction, such as frequently checking facebook, YouTube, X and other websites? Not only they distract us from performing any meaningful activity for prolonged period of time they also develop a kind of uneasiness and stress. The same applies to work apps like MS Teams etc., that easily distract you from whatever activity you are trying to do by messages, meetings, emails etc.
I am not sure about the work environment case, but I think it’s possible to confront this issue in a private space, by applying fasting approach to facebook, x, youtube etc. Even though I find x useful, for it contains useful information about, papers, books, interesting talks, most of the time it is very effective in wasting your time. The issue is that that time wasted while browsing, watching social media content can be invested in reading papers, books, and thinking.
Indeed, it feels like the main purpose of engaging in social media and social media itself is to prevent us from thinking about anything, for there is no time to stop and think since there is a need to scroll, click and consume the content. No energy is left to think why we are consuming the content and is it distracting, useless or even harmful in any way, like ultra processed food is.
So, one of the solutions is to abstain from social media for significant periods of time and using that free time to read paper books, printed scientific papers, to write your thoughts in a journal, and generally think about anything. I am not sure that 16/8 is applicable here especially, when your work includes working on a computer, but after the work such time off the digital realm seems crucial to be able to make any progress in a real physical world.
I guess people reading this post want to lose weight. So if you want to do it the solutions is simple!
Eat less, move more! Didn’t you know this already? For it’s only reasonable and natural. It’s the first law of thermodynamics which states that energy is conserved in closed system. Hence, energy entering the body in a form of food equals energy out. Or as also known calories in equal calories out (CICO).
So, stay in energy deficit and exercise more, for example pay for a gym membership.
Well, this advise is simple, reasonable and wrong! It’s wrong since it’s based on a false hypothesis called Energy Balance Model (EBM) of obesity.
It could work should human body have no hormones whatsoever, but it has and quite a few. Insulin isone of them that in presence of glucose blocks lipolysis (usage of fat for energy), and promotes lipogenesis (fat production and storage).
So, what’s the proper way to lose weight? Well, check Carbohydrate-Insulin Model (CIM) of obesity. The hypothesis that actually explains weight gain better than EBM and it states that lowering carbohydrates consumption as much as possible is the way to lose weight for good.
For more details, read the paper by prof. David Ludwig below
Conventional obesity treatment, based on the First Law of Thermodynamics, assumes that excess body fat gain is driven by overeating, and that all calories are metabolically alike in this regard. Hence, to lose weight one must ultimately eat less and move more. However, this prescription rarely succeeds over the long term, in part because calorie restriction elicits predictable biological responses that oppose ongoing weight loss. The carbohydrate-insulin model posits the opposite causal direction: overeating doesn’t drive body fat increase; instead, the process of storing excess fat drives overeating. A diet high in rapidly digestible carbohydrates raises the insulin-to-glucagon ratio, shifting energy partitioning towards storage in adipose, leaving fewer calories for metabolically active and fuel sensing tissues. Consequently, hunger increases, and metabolic rate slows in the body’s attempt to conserve energy. A small shift in substrate partitioning through this mechanism could account for the slow but progressive weight gain characteristic of common forms of obesity. From this perspective, the conventional calorie-restricted, low-fat diet amounts to symptomatic treatment, failing to target the underlying predisposition towards excess fat deposition. A dietary strategy to lower insulin secretion may increase the effectiveness of long-term weight management and chronic disease prevention. This article is part of a discussion meeting issue ‘Causes of obesity: theories, conjectures and evidence (Part II)’.
Today in the morning, my weight was 82 kg (180 lb).
Also, today is June 2nd and 11 days have left until it will be 2 years since I’ve started doing intermittent fasting.
It seems like a 80 kg (176 lb) weight will be a better one to celebrate the anniversary.
It means that within 11 days I need to lose 4 pounds (2 kg), and it’s better for it to be fat.
I think at this point in time after reading more than dozens of books on fasting and nutrition, after reading more than 50 scientific papers on nutrition and metabolism, after watching more than 200 videos on the subject weight loss and nutrition, and most importantly trying various approaches to weight loss I have a good grasp of how to lose these 2 kg.
Actually, losing weight is like engineering at this point. This is because when you know how it works it’s easy to calculate what needs to be done to lose weight.
The algorithm of weight loss is called Carbohydrate-Insulin Model (hypothesis, theory) of obesity.
This hypothesis says, that we gain weight when eating too much carbohydrates frequently throughout the day.
This causes insulin hormone to be released which inhibits fat mobilization, and promotes fat storage. As a consequence, the body doesn’t get the energy it expected to get from the food one ate, hence the elevated hunger and cravings. Which cause a person to eat again and again, even though she has enough energy in a form of fat stored in the body.
Now, that we know how we gain weight, to lose weight we need to do the reverse: stop eating carbohydrates, or eat less than 100 gram of them in a day, which is known as insulin lowering diet or low-carb diet. Ketogenic diet and intermittent fasting achieve the same effect by lowering insulin level, since you don’t get carbs in the system.
Pay attention, that we are not talking about eating less, we are talking about stopping eating carbs. You can eat other food that contains protein and fat without any issue. Pay attention, that vegetable oils, like soybean, corn etc. are found to be inflammatory, so olive oil is the best.
Also, saturated fat in animal products is neutral to beneficial to our health, so I eat it without any issue.
Also, sugar is a carb and that is why it and any food that sugar is added to is also a good candidate for elimination from the diet. It means food that’s out is: sugary drinks, bread and buns, cookies, sweets, sweet chocolate, natural juices etc. Ultra processed food, like chips, snacks, pizzas etc. is out too.
So, to summarize to lose weight in an engineered way I will:
Continue Intermittent Fasting regimen by having 16 hours fast, 8 hours eating window.
Continue eating mostly low carb diet, and restraining from eating food that contains any sugar.
Continue walking outside just for fun, since it’s free and affordable to almost everyone, unlike a gym membership.