Tools for Deep Learning development
To start playing with Deep Learning one have to pick a proper tool for it. Python ecosystem tools for Deep Learning such as Keras, Theano and TensorFlow are easy to install and start development. Below follows a guide on how to install them on Windows and Linux operating systems.
What are those Theano, TensorFlow and Keras all about?
A few words about those tools from official websites.
Theano is a Python library that allows you to define, optimize, and evaluate mathematical expressions involving multi-dimensional arrays efficiently.
TensorFlow™ is an open source software library for numerical computation using data flow graphs.
Keras is a high-level neural networks library, written in Python and capable of running on top of either TensorFlow or Theano. It was developed with a focus on enabling fast experimentation. Being able to go from idea to result with the least possible delay is key to doing good research.
Windows Strikes Back or a Big Surprise
A few days ago after upgrading to Ubuntu 16.04 from 15.10 I wanted to run some code example in TensorFlow but I found out that TensorFlow was not working. So I switched to Windows thanks to a dual-boot installation and to my amazement found that Keras -> Theano and Keras -> TensorFlow can be installed and run there very easily with some caveats. So let’s proceed to installation steps.
Prerequisites for Windows 7 or 10
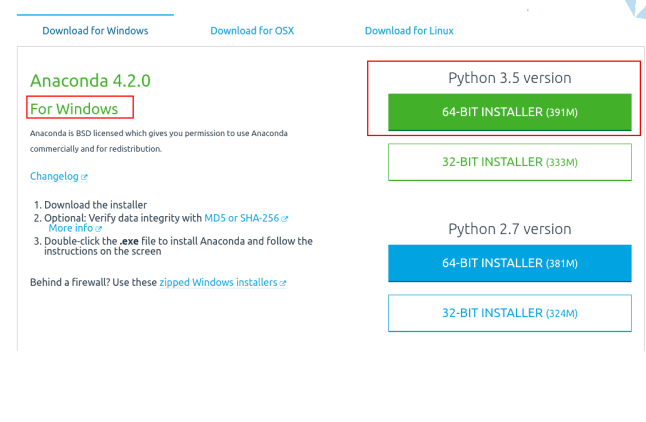
It is possible to install Theano and Keras on Windows with Python 2 installation. However, if you want to be able to work on both Theano and TensorFlow then you need to install Python 3.5. As of now TensorFlow 0.12 is supported on 64 bit Windows with Python 3.5. The steps below aim at providing support for Theano and TensorFlow.
To summarize the prerequisites for TensorFlow on Windows7/10 are
- 64 bit OS
Note: I’ve found out that starting from Anaconda 3 version 4.3.0 the tutorial for Windows is broken due to the changes they introduced!
That is why for it to work use the following Anaconda version
2. Python 3.5 (Anaconda 3) use Anaconda 3 version 4.2.0 that has Python 3.5 and not 3.6
Anaconda Is Very Helpful
Anaconda is an open source packaging tool for Python and other languages. It is very helpful, easy to use and intuitive with detailed tutorials. It will help us install Python and all the dependencies for Keras, Theano and TensorFlow with only a few directives. Anaconda is brought to you by Continuum Analytics.
So if you have 64 bit Windows PC or a VM do the following steps.
- Install Anaconda for 64 bit OS. This process takes a few minutes and a few hundreds MB of space.
- After Anaconda was installed open terminal and Install Theano.
- When you are asked about installing dependencies click ‘y’ for yes.
C:\>conda install theano
- To enable gcc compiler for Theano install following
- When you are asked about installing dependencies click ‘y’ for yes.
C:\>conda install mingw libpython
- That’s it theano is installed. To check what version is installed
C:\>conda list theano
- To install TensorFlow and Keras we’ll need to use pip Python packaging manager which is included in Anaconda
C:\>pip install tensorflow
C:\>pip install keras
- To figure out what is the current backend type
C:\>python -c "from keras import backend; print(backend._BACKEND)"
- To be able to change what backend Keras will use it is possible to edit keras.json configuration file. It may be found at
C:\Users\relevantUser\.keras\keras.json
- Change the “backend” string to “theano” or “tensorflow” according to your needs.
{
"image_dim_ordering": "tf",
"epsilon": 1e-07,
"floatx": "float32",
"backend": "theano"
}
- To test that they work at all let’s run this example in Python interpreter line by line
C:\>python
>>> import theano
>>> from theano import tensor
>>> a = tensor.dscalar()
>>> b = tensor.dscalar()
>>> c = a + b
>>> f = theano.function([a,b],c)
>>> result = f(1.5, 2.5)
>>> print(result)
4.0
>>>
- To see that Keras is really functioning you may run a code for multi layer perception at GitHub.
Same Process on Linux (Ubuntu)
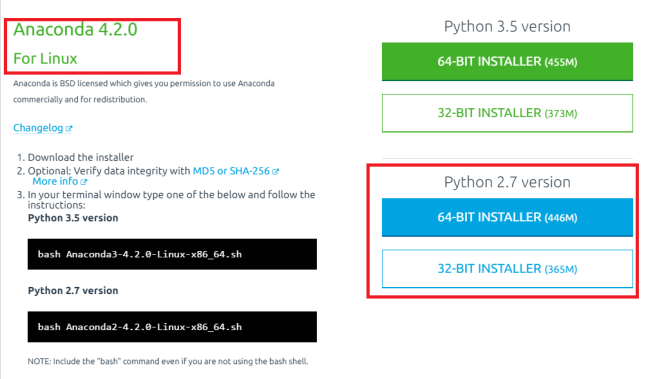
Installation of Keras, Thano and TensorFlow on Linux is almost the same as on Windows. Actually it is even easier since TensorFlow is working nice with Python 2 on Ubuntu. That is why below I’ll provide installation steps for 64 bit Ubunut 16.04 and Python 2.
- Install Anaconda for 64 bit OS. This process takes a few minutes and a few hundreds MB of space.
- After Anaconda was installed open terminal and Install Theano.
$ conda install theano
- That’s it theano is installed. To check what version is installed
$ conda list theano
- To install TensorFlow and Keras run this commands
- If you are asked about installing dependencies click ‘y’ for yes.
$ conda install tensorflow
$ conda install keras
- To figure out what is the current backend type
$ python -c "from keras import backend; print(backend._BACKEND)"
- To be able to change what backend Keras will use it is possible to edit keras.json configuration file. It may be found at
$ ~/.keras/keras.json
- Change the “backend” string to “theano” or “tensorflow” according to your needs.
{
"image_dim_ordering": "tf",
"epsilon": 1e-07,
"floatx": "float32",
"backend": "theano"
}
- To test that they work at all let’s run this example in Python interpreter line by line
$ python
>>> import theano
>>> from theano import tensor
>>> a = tensor.dscalar()
>>> b = tensor.dscalar()
>>> c = a + b
>>> f = theano.function([a,b],c)
>>> result = f(1.5, 2.5)
>>> print(result)
4.0
>>>
- To see that Keras is really functioning you may run a code for multi layer perception at GitHub.
Official References
What’s next?
Deep Learning.
![]()

Wonderful article and easy to follow.
I am a beginner in Deep learning. I am running into a problem of python out of memory when using keras for training deep network. I have installed keras theano tensorflow on windows 7 and I am using theano as backend for my deep network. The network is not very large (2 Convlayers and 2 Fully connected). Could you please suggest what could be the problem? Is it linked to the installation of theano? Thank you.
Thank you for the kind words.
Regarding the issue you have. In order to understand what is the problem here please provide a more detailed scenario.
1. What is the setup
a. Python version
b. Keras version
c. Theano version
d.RAM quantity: 8 GB,16G B, etc
2. Logs or printouts
3. In addition you may also consult the blog of Fabien Tence
http://ankivil.com/installing-keras-theano-and-dependencies-on-windows-10/
which is more experienced in the filed then I am currently.
Hi Andrei, Thank you for your reply. I resolved the issue by reinstalling the python anaconda 3. I was initially installing everything on python anaconda2 version. This out of memory issue just went away with this update. Thank you once again.
OK then.
TensorFlow is not supported with Anaconda 2 because it needs Python 3.5.
The prerequisites for TensorFlow on Windows7/10 are
1. 64 bit OS
2. Python 3.5 (Anaconda 3)
Yes. But initially i was just using only theano as the backend. Even the code was running using keras but i was getting memory out problem after certain iterations. But it is now resolved. Thank you for your reply.
By the way you may check out those books on Machine/ Deep Learning of Jason Brawnlee I use myself for learning about the subject. Recommended. They may help from practical point of view.
http://machinelearningmastery.com/
Thank you very much. It helped me to setup Theano, keras ans Tensorflow pretty easy.
Thank you Indhu.
Hi Andrei,
Thanks for the article. I have used it in order to install Tensorflow, however if you want to use the gpu version you have to use pip install tensorflow-gpu, and also install CUDA and cuDNN. I wrote an article to explain it in detail to help installing and testing it:
https://sites.google.com/site/ivanhuertacasado/installing-keras-theano-tensorflow-with-gpu-windows/
Ivan
You are right regarding GPU. In order to use it there is a need in additional installation steps.
Andrei,
I will try your steps with Ubuntu 16.04.
I am Tursun ,I am in Malaysia.
I want to use Keras to make CNN, DBN, RNN for my dataset and see which one shows best classification result.
Then compliment the installation steps with this tutorial by Ivan in order to be able to use GPU
https://sites.google.com/site/ivanhuertacasado/installing-keras-theano-tensorflow-with-gpu-windows/
I did install according to your steps. sucessful , thank you.
One thing to mention:
after Anaconda installation in Ubuntu 16.04 (with python 2.7), when i type “spyder” in terminal, it says SPYDER is not installed. asked me if i want to install with “sudo” , Im annoyed. I didnt and switch off laptop for lunch. when I switch on laptop new, then I can run sypder by typing “spyder” in terminal.
so , we should restart after installing Anaconda, I think.
I also made screen shot tutorial about entire process.
thank you.
Simple and easy to follow guide. It worked for me with no headache .. Thank you! One thing that I didnt do yet is , I didn’t test keras , you mentioned to put it in GitHub
Nice to hear that this tutorial was useful. If you want to test Keras try this tutorial.
Wonder Article Mr. Andrei. I just installed with Anaconda3-4.4.0-Linux-x86_64.sh which comes with python 3.6 and could test the simple program that you discussed on ubuntu 14.04. Hope this will be helpful for Deeplearning.
Is it possible to get different Deeplearning test programs executed for Image processing similar to the DIGITS used in NVIDIA site? I could proceed there since I did not have a GPU and forces us to have one
Thank you for the kind words. Actually, I am not aware of DIGITS used in NVIDIA site. Anyway it is possible to execute various Deep Learning algorithms without any GPU. It depends on the computational complexity of the problem and time you are willing to wait to train the model. If the model is small then it is possible to use only CPU.
HI Andrei
Thank you very helpful.
This is probably more of an issue of anaconda:
If anaconda and anaconda3 are both installed in windows 64 and on the path , pip or conda gets confused and returns with various error messages such as:
“Could not find some dependencies for theano: m2w64-toolchain.”
When I renamed the existing Anaconda directory to Anaconda2 without updating the path, so as to remove it from the path, the installed worked. ( and keeping Anaconda3 as is and keeping it on the path)
Hi Mr. Andrei
Thanks a lot for your nice post.
I would greatly appreciate if you could let me know how to fix this error:
C:\Users\Markazi.co\Anaconda3\python.exe D:/mifs-master_2/MU/learning-from-imbalanced-classes-master/learning-from-imbalanced-classes-master/continuous/example.py
Traceback (most recent call last):
You can find the C code in this temporary file: C:\Users\Markazi.co\AppData\Local\Temp\theano_compilation_error_l19nny62
File “C:\Users\Markazi.co\Anaconda3\lib\site-packages\theano\gof\lazylinker_c.py”, line 75, in
raise ImportError()
ImportError
During handling of the above exception, another exception occurred:
Traceback (most recent call last):
File “C:\Users\Markazi.co\Anaconda3\lib\site-packages\theano\gof\lazylinker_c.py”, line 92, in
raise ImportError()
ImportError
During handling of the above exception, another exception occurred:
Traceback (most recent call last):
File “D:/mifs-master_2/MU/learning-from-imbalanced-classes-master/learning-from-imbalanced-classes-master/continuous/example.py”, line 1, in
import theano.tensor as T
File “C:\Users\Markazi.co\Anaconda3\lib\site-packages\theano\__init__.py”, line 110, in
from theano.compile import (
File “C:\Users\Markazi.co\Anaconda3\lib\site-packages\theano\compile\__init__.py”, line 12, in
from theano.compile.mode import *
File “C:\Users\Markazi.co\Anaconda3\lib\site-packages\theano\compile\mode.py”, line 11, in
import theano.gof.vm
File “C:\Users\Markazi.co\Anaconda3\lib\site-packages\theano\gof\vm.py”, line 673, in
from . import lazylinker_c
File “C:\Users\Markazi.co\Anaconda3\lib\site-packages\theano\gof\lazylinker_c.py”, line 127, in
preargs=args)
File “C:\Users\Markazi.co\Anaconda3\lib\site-packages\theano\gof\cmodule.py”, line 2359, in compile_str
(status, compile_stderr.replace(‘\n’, ‘. ‘)))
.
Process finished with exit code 1
Thanks in advance,
I am afraid I cannot help you in this specific case. I advise you to Google this issue. It seems like a problem in python imports you used. Anyway, Theano is no longer supported. So it is probably better to switch to TensorFlow or PyTorch.